It's that time of year again. Kingdom A&S in Ealdormere is approaching in March, and as the host Baron and a member of the Order of the Crucible, I'm feeling like I need to pull out something from my bag of tricks.
As you may know from reading this blog in the past, I don't like doing the same old same old when it comes to A&S projects. I like things that are out of the ordinary, or that I haven't seen done before in the SCA context. That's how I got to the stick purse and the leather dyes, and I think I've come up with a good one this time.
I'm not going to get into too much detail here because I want the project to be a bit of a surprise, but I'll give some hints:
1) The item that inspired it was something I saw from one of our museum stops in Europe.
2) The type of item was not done in Europe in period, but would have been encountered by European travelers. The culture that produced it had extensive interactions with Europe, and the items go back to at least the 12th C in that culture. It didn't arrive in Europe until the early 17th C.
3) It is a leather item.....sort of. :)
4) As usual, I'm having to lean some new skills to make it.
5) As usual, I could be biting off more than I can chew, so we'll see if I can pull it off. Possible I'll enter something that's not completed or I might have to scale it down from the full period examples (which are large, incredibly ornate and complicated). To give you a sense, modern makers with extensive expertise at using traditional techniques usually take up to 5 months to make the thing I'm looking at.
On the bright side, my research is more or less complete, other than re-reading a few peer reviewed papers to make sure I've got everything for my documentation.
Showing posts with label leather. Show all posts
Showing posts with label leather. Show all posts
Tuesday, 21 January 2020
Tuesday, 10 September 2019
Stay tuned - New major project underway
Sorry its been kinda dead around here lately. Other than posting my class handouts I haven't really posted in a while. I haven't really been doing much leatherworking. Mostly just bodging little things together or repairing items.
Part of that is that we were selected as Baron and Baroness of Skraeling Althing last November, so most of my free time is going towards planning things for the Barony, and part of it is a lingering shoulder injury from last Pennsic which doesn't like certain movements needed for leather projects.
I've been doing some silk banner painting, and playing around with carving fabric stamps, but that's been about it.
But in the last few weeks I've started a major project that folks around here will likely be interested in.
As a continuation of my leather dye project, I'm developing a new database for period leather dye recipes.
Soon you'll be able to search for recipes that use particular ingredients, produce a certain colour or come from a particular region or time period. I won't have the actual recipes, since they are copyrighted. But I will include links to the sources, and will include my redactions and notes in cases where I've tried the recipe.
I'm hoping to have the full thing created and all the data inputed by the end of the year.
So stay tuned, big things afoot.
Tuesday, 19 December 2017
Voyage of the Stick Purse (AKA Crazy European Adventure)
I know, it's been a while since I've posted, real life and work have meant I've done very little A&S activity this past 6+ months. But I have a doozy of a post for you this time.
This fall Avelyn and I spent almost a month travelling through Europe. We stopped in Paris for almost a week, and then did a tour through Belgium, Netherlands and Germany. On the trip, I was on the lookout for representations of the stick-purse. I also planned a visit to the Fries Museum to actually see the original artefact and see if I could see for myself some of the construction questions I still had. So, without further ado, here are examples of the stick-purse that I found.
France:
We saw lots of really cool things in France, but only one stick purse to be found. It's a post period painting from the Louvre called A man weighing gold by Gerard Dou. I've posted the pictures on my smugmug account at: https://dgotlieb.smugmug.com/Travel/Europe-2017/France/Louvre/i-7PdhPqp/A

Belgium:
More luck in Belgium. We stopped in both Brussels and Bruge and I found an example at the Old Masters museum in Brussels. This one is also post-period and is called The Money Counter by Willem van der Vliet. Here's the link: https://dgotlieb.smugmug.com/Travel/Europe-2017/France/Louvre/i-7PdhPqp/A

Netherlands:
We found a few good examples here but not as many as I expected. I'll go in order. First up is the Boijmans Van Beuningen museum in Rotterdam. They had a couple of post-period etchings that I hadn't seen before.
The first one is "Christ Driving the Money Changers from the Temple" by Rembrant.
https://dgotlieb.smugmug.com/Travel/Europe-2017/Netherlands/Bojimans-van-Buningen-Museum/i-hRLBd8v/A
https://dgotlieb.smugmug.com/Travel/Europe-2017/Netherlands/Bojimans-van-Buningen-Museum/i-Tx54XkT/A


The second is an engraving done by Salomon Savery based on Rembrant's work, also post period.
https://dgotlieb.smugmug.com/Travel/Europe-2017/Netherlands/Bojimans-van-Buningen-Museum/i-7L6PS3b/A
https://dgotlieb.smugmug.com/Travel/Europe-2017/Netherlands/Bojimans-van-Buningen-Museum/i-DdFxrmp/A


There were no stick-purses in Amsterdam that we found, but then we went to the Fries Museum to see THE stick-purse. :)
I took dozens of close ups from multiple angles. Main discoveries were that it looks like I did in fact engineer the bottom and the back seem correctly, which is what I really was hoping to be able to check (yay). However, in discussion with Avelyn and looking closely, the pouch probably had flaps originally. There are what look like leather buttons still attached to the pouches. Here are a few pictures, but all of them are posted in the Fries Museum album.


The first is a painting called The Quill Pen Cutter (I know, right????) from 1627 by Jan Lievens.


None of these paintings were part of my original research of the stick-purse, so I feel like I've added to my knowledge, even if they were all post period. Plus I was able to confirm that my informed guesses about the construction of the Fries purses were bang on, which makes me pretty happy (even if I do need to make a new one now to add the flaps.) :)
This fall Avelyn and I spent almost a month travelling through Europe. We stopped in Paris for almost a week, and then did a tour through Belgium, Netherlands and Germany. On the trip, I was on the lookout for representations of the stick-purse. I also planned a visit to the Fries Museum to actually see the original artefact and see if I could see for myself some of the construction questions I still had. So, without further ado, here are examples of the stick-purse that I found.
France:
We saw lots of really cool things in France, but only one stick purse to be found. It's a post period painting from the Louvre called A man weighing gold by Gerard Dou. I've posted the pictures on my smugmug account at: https://dgotlieb.smugmug.com/Travel/Europe-2017/France/Louvre/i-7PdhPqp/A

Belgium:
More luck in Belgium. We stopped in both Brussels and Bruge and I found an example at the Old Masters museum in Brussels. This one is also post-period and is called The Money Counter by Willem van der Vliet. Here's the link: https://dgotlieb.smugmug.com/Travel/Europe-2017/France/Louvre/i-7PdhPqp/A

Netherlands:
We found a few good examples here but not as many as I expected. I'll go in order. First up is the Boijmans Van Beuningen museum in Rotterdam. They had a couple of post-period etchings that I hadn't seen before.
The first one is "Christ Driving the Money Changers from the Temple" by Rembrant.
https://dgotlieb.smugmug.com/Travel/Europe-2017/Netherlands/Bojimans-van-Buningen-Museum/i-hRLBd8v/A
https://dgotlieb.smugmug.com/Travel/Europe-2017/Netherlands/Bojimans-van-Buningen-Museum/i-Tx54XkT/A


The second is an engraving done by Salomon Savery based on Rembrant's work, also post period.
https://dgotlieb.smugmug.com/Travel/Europe-2017/Netherlands/Bojimans-van-Buningen-Museum/i-7L6PS3b/A
https://dgotlieb.smugmug.com/Travel/Europe-2017/Netherlands/Bojimans-van-Buningen-Museum/i-DdFxrmp/A


There were no stick-purses in Amsterdam that we found, but then we went to the Fries Museum to see THE stick-purse. :)
I took dozens of close ups from multiple angles. Main discoveries were that it looks like I did in fact engineer the bottom and the back seem correctly, which is what I really was hoping to be able to check (yay). However, in discussion with Avelyn and looking closely, the pouch probably had flaps originally. There are what look like leather buttons still attached to the pouches. Here are a few pictures, but all of them are posted in the Fries Museum album.


Germany:
Our next stick-purse sighting was in Cologne Germany at the Wallraf Museum. Here we found two new paintings I'd never seen before (they have no mention of money changers or anything related in their titles).
The first is a painting called The Quill Pen Cutter (I know, right????) from 1627 by Jan Lievens.

The second one is Sampson and Delilah by Jan Steen from about 1660. Again it had nothing really to do with the topic but there's a money lender in the corner of the painting.


Friday, 11 November 2016
News and Thinky Thoughts from Feast of the Hare
So, now that the post about the projects for Feast of the Hare is out of the way, I can report on the rest of the stuff that happened at the event. This is going to be another long one I think (sorry).
It was a crazy busy Feast of the Hare this year, even more than usual. Part of that was because we hosted the Rick Mercer Report, which was pretty cool. I spent a large part of the day running around to support Avelyn while she did her job as Kingdom Media Relations Deputy, and of course taking pictures.
Here's a pic I took while I was playing paparazzi.

The other thing I did over the course of the day was a little bit of fencing. I haven't been to practice much lately, but I always try to enter the Baronial Champion Tourney, which is run at Hare. I feel its part of my job as a former Champion to participate.
This year the format was different. It was a single elimination tourney with retained wounds, which means when I lost my left arm in the first fight, I couldn't use it for the rest of the tournament. We started out with eight fighters but due to a double kill in the first round, we had three finalists. I suggested to Her Excellency that we do a last man standing melee to solve it, rather than a round robin. She grinned and giggled with glee (she may have also chanted Kill, Kill, Kill, I can't remember).
I was at a disadvantage without my left arm, but I probably had a bit of an advantage in having fought in a lot of melee situations, so it may have balanced out. We swirled around for a while and then after a minute or so of back and forth, first one than the other of my opponents were out and I was last left standing. So I am now both the Rapier and Thrown Weapons champion for the Barony (although apparently I'm not allowed to throw my rapiers, which really takes some of the fun out of it). :)
During Baronial court, in addition to officially being named as Their champion, I also assisted with the presentation of taxes. This year the taxes for the populace taking a class and teaching a class, which totally falls within the scope of my job as Minister of Arts and Sciences. So I plotted with Her Excellency Lucia to introduce some shtick. After everyone else presented their taxes, I presented Their Excellencies with a scroll that captured all teaching and learning that had been reported to me in our A&S reports for the year. I offered to read it out alphabetically, but given the scroll was 10 feet long, I thought I'd save the populace that pain and just rolled it out in front of Their Excellencies. It went down to my feet and across the floor, it was epic!
Then, during Kingdom court, something else happened. It's a bit of a blur, but I was busy taking pictures as usual when Their Majesties called up the Order of the Crucible. The next thing I know my name is being called, and now I am a member of that really impressive Order (I even have a really awesome scroll to prove it).

After I stood up I got swarmed by a whole bunch of people giving me hugs, AElfwyn being first in line. Beyond that it was all kind of a blur, but it was really awesome being surrounded by so many people who I really respect and consider my friends. The fact that they wanted me to join them and think I belong, and that Their Majesties agreed, was a bit overwhelming.
So this is where the thinky thoughts come in. For a guy with zero artistic ability (who nearly failed art class in Junior High and never took anything artistic except for performance arts after that), being inducted to a Grant-level order for my work in the arts and sciences is kind of mind boggling. I still think of myself as the same guy who took that very first Intro to Leatherworking class from Tiberius at Practicum 5-6 years ago.
But its also I think a really good story to tell new people who join the SCA. I can't draw, or paint, or really do anything that modernly we would consider "art", and yet here I am making things like the stick-purse or my black and white kidney pouch, and having people come to me for advice on leatherworking (that still feels weird, my first reaction is still to redirect them to someone who knows what they're doing). If I can learn this stuff, dig into it, and get to this point - anybody can with a bit of work and some elbow grease.
It was a crazy busy Feast of the Hare this year, even more than usual. Part of that was because we hosted the Rick Mercer Report, which was pretty cool. I spent a large part of the day running around to support Avelyn while she did her job as Kingdom Media Relations Deputy, and of course taking pictures.
Here's a pic I took while I was playing paparazzi.

The other thing I did over the course of the day was a little bit of fencing. I haven't been to practice much lately, but I always try to enter the Baronial Champion Tourney, which is run at Hare. I feel its part of my job as a former Champion to participate.
This year the format was different. It was a single elimination tourney with retained wounds, which means when I lost my left arm in the first fight, I couldn't use it for the rest of the tournament. We started out with eight fighters but due to a double kill in the first round, we had three finalists. I suggested to Her Excellency that we do a last man standing melee to solve it, rather than a round robin. She grinned and giggled with glee (she may have also chanted Kill, Kill, Kill, I can't remember).
During Baronial court, in addition to officially being named as Their champion, I also assisted with the presentation of taxes. This year the taxes for the populace taking a class and teaching a class, which totally falls within the scope of my job as Minister of Arts and Sciences. So I plotted with Her Excellency Lucia to introduce some shtick. After everyone else presented their taxes, I presented Their Excellencies with a scroll that captured all teaching and learning that had been reported to me in our A&S reports for the year. I offered to read it out alphabetically, but given the scroll was 10 feet long, I thought I'd save the populace that pain and just rolled it out in front of Their Excellencies. It went down to my feet and across the floor, it was epic!
Then, during Kingdom court, something else happened. It's a bit of a blur, but I was busy taking pictures as usual when Their Majesties called up the Order of the Crucible. The next thing I know my name is being called, and now I am a member of that really impressive Order (I even have a really awesome scroll to prove it).

After I stood up I got swarmed by a whole bunch of people giving me hugs, AElfwyn being first in line. Beyond that it was all kind of a blur, but it was really awesome being surrounded by so many people who I really respect and consider my friends. The fact that they wanted me to join them and think I belong, and that Their Majesties agreed, was a bit overwhelming.
So this is where the thinky thoughts come in. For a guy with zero artistic ability (who nearly failed art class in Junior High and never took anything artistic except for performance arts after that), being inducted to a Grant-level order for my work in the arts and sciences is kind of mind boggling. I still think of myself as the same guy who took that very first Intro to Leatherworking class from Tiberius at Practicum 5-6 years ago.
But its also I think a really good story to tell new people who join the SCA. I can't draw, or paint, or really do anything that modernly we would consider "art", and yet here I am making things like the stick-purse or my black and white kidney pouch, and having people come to me for advice on leatherworking (that still feels weird, my first reaction is still to redirect them to someone who knows what they're doing). If I can learn this stuff, dig into it, and get to this point - anybody can with a bit of work and some elbow grease.
Friday, 16 September 2016
Prep work for Feast of the Bear Part II - With Pictures
This is part two of my post on prep work we did for Feast of the Bear. Part one covered the making of AElfwyn's vigil book with Master Giovanni.
AElfwyn's vigil and elevation ceremony was based on Anglo-Saxon ceremonies. So we knew we needed to look the part. Now, I don't normally do early period beyond the occasional Norse, and I certainly didn't have any garb that suited a formal Anglo-Saxon event. I also hadn't had any luck in the past making a pair of shoes that actually fit and looked right.
Sooo, new garb and new shoes were in the cards.


Avelyn spent weeks leading up to the event sewing the tunics, and spent her day at the event hand stitching a cap for me.
AElfwyn's vigil and elevation ceremony was based on Anglo-Saxon ceremonies. So we knew we needed to look the part. Now, I don't normally do early period beyond the occasional Norse, and I certainly didn't have any garb that suited a formal Anglo-Saxon event. I also hadn't had any luck in the past making a pair of shoes that actually fit and looked right.
Sooo, new garb and new shoes were in the cards.
Shoes:
I'd previously made a pair of shoes but the ended up being way too wide and about two sizes too big because I did a poor job of tracing the sole. But they also weren't particularly early period, so I needed to adjust the pattern for the uppers as well.
I based my shoes on the Anglo-Scandanavian Shoe pattern by Marc Carlson.
I used my milled veg tan leather (which was the leather from the Stick-Purse) and dyed it using walnut dye extract that I bought on our trip to Montreal. It produced the same nice brown as the black walnuts without the mess of handling them. Just add water. :)
The shoes are stitched using waxed linen thread.
Here is the one shoe before I turned it and then after fighting with it to turn it right-side out.


And here are the two shoes turned and on my feat to test the fit (still a little bit wide and long but certainly wearable).

The original artifacts often have holes along the top edge, which may suggest edge trim was applied to clean it up. I also find it stiffens up the shoe a bit so it holds its shape a bit better, so I did that too. I left the leather natural colours as I thought it would give good contrast with the darker brown shoes.
Carlson also has an interesting latch system for keeping the shoes closed, which don't actually use any stitches to anchor the latches. I'd never tried that before but gave it a shot, and it seems to work OK. You cut small holes and wedge thicker straps through the holes and it locks into place.
So here's the finished shoe. You'll see them on my feet in the garb pictures below as well.

Garb:
While I was working on the book cover and the shoes, Avelyn was busily working on making me look good. :)
We got all the fabric we needed in Montreal, and commissioned Baroness Mahault to do up some nice boar-themed embroidery for the collars and cuffs.
We got all the fabric we needed in Montreal, and commissioned Baroness Mahault to do up some nice boar-themed embroidery for the collars and cuffs.
Avelyn spent weeks leading up to the event sewing the tunics, and spent her day at the event hand stitching a cap for me.
I'll leave the details to her to tell since it wasn't my project but needless to say I'm super appreciative. She did an awesome job. Thanks also to Emelote and Bethoc for last minute help getting the finishing touches done on the night before we left. :)
 |
| The undertunic, cap and shoes |
 |
| Here I am on the left in the overtunic. |
Wednesday, 14 September 2016
Making stuff for Feast of the Bear - Part 1 (With Pictures)
Feast of the Bear was a super important event this year, but that's not all that unusual. For some reason, stuff seems to happen at Feast of the Bear. That's the event I received my Award of Arms in 2008, at the very same church where it was held this year.
At Trillium war in July, to a great deal of rejoicing, Mistress AElfwyn was put on vigil for the Order of Chivalry. Their Majesties wanted to do the elevation before the end of Their reign, so AElfwyn selected Feast of the Bear as her elevation event.
As AElfwyn's apprentice, I had a small part in the ceremony, so we've spent the past few weeks making things so that I would look the proper Anglo-Saxon(ish) part. That's why we did the fabric shopping trip to Montreal, so we could find fabric that had the right colour tones and fibre content. I also made a pair of new shoes, since a pair of modern running shoes would have ruined the look. :)
On top of all that, Master Giovanni asked me to work with him again on the vigil book by doing the leatherwork for the cover.
So, its been a busy few weeks. Here is part one of my Feast of the Bear work, the vigil book. Other stuff will be covered in the next post.
My initial idea was to base the cover on the St Cuthbert Gospel, which is an 8th century Anglo-Saxon book. However, the cover on the Gospel is super complex, with raised sections, tooled sections and is both dyed red and painted with gold highlighting (or more likely gold leaf). Given the timeline for the project I thought it best to take inspiration from the design, but not to try to replicate it entirely. I also wanted to customize it a bit for AElfwyn by replacing the core design with a boar.
First I had to sand the leather to get the pressed layer off (I had to do the same thing for the last book we did, it was AElfwyn's suggestion at the time). Once it was sanded I did the tooling. Here's the tooled wet leather:


At Trillium war in July, to a great deal of rejoicing, Mistress AElfwyn was put on vigil for the Order of Chivalry. Their Majesties wanted to do the elevation before the end of Their reign, so AElfwyn selected Feast of the Bear as her elevation event.
As AElfwyn's apprentice, I had a small part in the ceremony, so we've spent the past few weeks making things so that I would look the proper Anglo-Saxon(ish) part. That's why we did the fabric shopping trip to Montreal, so we could find fabric that had the right colour tones and fibre content. I also made a pair of new shoes, since a pair of modern running shoes would have ruined the look. :)
On top of all that, Master Giovanni asked me to work with him again on the vigil book by doing the leatherwork for the cover.
So, its been a busy few weeks. Here is part one of my Feast of the Bear work, the vigil book. Other stuff will be covered in the next post.
The book:
I knew I wanted to do something more than just dye the leather, which certainly added some complexity for both me and Giovanni. I had to be precise in the measurements to make sure any tooling etc. was placed correctly for when he made the book. I pushed the envelope a lot on this one, doing a number of new techniques I'd never tried under a tight timeline. Some of it worked, others didn't. In the end, I figured that AElfwyn would appreciate me trying to push the envelope so I went with it. :)My initial idea was to base the cover on the St Cuthbert Gospel, which is an 8th century Anglo-Saxon book. However, the cover on the Gospel is super complex, with raised sections, tooled sections and is both dyed red and painted with gold highlighting (or more likely gold leaf). Given the timeline for the project I thought it best to take inspiration from the design, but not to try to replicate it entirely. I also wanted to customize it a bit for AElfwyn by replacing the core design with a boar.
First I had to sand the leather to get the pressed layer off (I had to do the same thing for the last book we did, it was AElfwyn's suggestion at the time). Once it was sanded I did the tooling. Here's the tooled wet leather:

Once I did the tooling I realized I screwed up my placement, and essentially tooled the back cover. So I had to modify the plan and do matched tooling on the front and back, like so:

Once the leather was tooled I had to dye it. This is where I made another mistake. Rather than using my existing period red dye recipe, I tried to modify the process based on what Mistress Lucrece did for her recent book project. My hope was that it would give me a truer red. But these are natural dyes and any little variation can throw things off, so it ended up not working out quite the way I intended. The colour was more a brownish purple than red, and it didn't bind well to the leather. More experimentation needed, but I ran out of time and had to go with it since a dye batch takes a couple of days to make.
The dying process took a few days between pre-treating the leather with alum water and then doing multiple coats of dye with drying time between. Just in case the tooled section messed up I dyed the whole skin so Giovanni would have enough space to make a plain leather cover as a back-up plan.
Once it was dried, I used my black water-based leather dye from Zeli's to make the boars black. Unfortunately I found because the red dye wasn't adhering well to the leather, painting on top of it also presented challenges. Each black coat had to dry much longer before I went back for another coat, or it would come right off. I was also worried it would rub off when my top coat was applied.
Once I got the black to where I was happy with it, I took some metallic gold craft paint and a micro brush and painted all of the tooling lines on the boars. I bought five different types of paint and tested them to see which was the least likely to rub off. The best of the bunch was from Martha Stewart that I bought at Michael's.
Here are pictures of the boars painted.


I then had to decide what to do with the border. The original Gospel had a raised line that delineated the border, but the logistics of knowing how much space to leave Giovanni to do that were daunting, so I decided to skip that. In the end I decided to paint the knotwork with the gold paint, but leave the outer lines plain.

After that I let it all dry and applied the a modern top coat to hopefully stop anything from rubbing off as the book was handled. This led me to doing a bit of touching up on the boars as some of the black flaked off, and it did wear away some of the colour, but not too bad. I also had a problem with the top coat making a chalky layer on the leather, which has never happened before. That really pissed me off but no amount of buffing was helping get rid of the coating.
In the end I think it turned out pretty well, although there's a number of things I would do differently. Giovanni did a great job making the book itself. I'm sure it was a nightmare trying to make sure the covers lined up properly because of the tooled border.
Avelyn described it as looking like an actual artifact that was pulled form the ground (which I think is something that would please AElfwyn) because of the way the dyes rubbed off in some places. It looks weathered.
Here's a picture of the final book that Giovanni took once it was finished.

Tuesday, 13 September 2016
Summer Siege Wrap Up - With Pictures
Running a bit behind with blog posts, its been a crazy few weeks getting stuff ready for multiple events.
Summer Siege, as always, was a busy event for me. It was also a Royal progress stop this year as we had a Laurel ceremony happening, so the attendance was significantly higher than usual.
Normally I'm running the rapier list since I'm the Canton's Rapier Marshal, but this year we tried a new format for the A&S activities and as Baronial A&S Minister I ran that instead. Gavin was kind enough to volunteer to run Rapier, and while we didn't have the record number of fencers we had last year, it looked like a pretty good turn-out and folks seemed to have fun.
Normally in the past for the event I have borrowed the Caldrithig armoured combat list poles from His Excellency Shahid, but they are rather large and heavy, and really overkill for rapier. So this year, Avelyn and I worked to make a new set of list poles, based on the ones Jocelyn loaned me last year for the Althing. We even got a bit of power tool help from Avelyn's dad, since our little hand drill was rather under-powered for the job.
The best part of them is that instead of taking up half the back of our truck, I can disassemble them and they fit into a duffel bag. They're super light weight.
Here are a couple of pictures of them in action. We'll call them the prototype, since there are some things I may want to adjust, but they seemed to work OK for their maiden event.


During the tourney I knew I didn't throw as well as the previous year, but I hit a good number of throws from 10 ft, but not much from 20 ft, so I knew it would be tight.
In court I was called up to step down as champion, where I surprised Their Excellencies with a new axe and heraldic axe cover for the champion (I did the same when I stepped down as Rapier Champion, so now it's twice, so its a tradition!). Eluned picked up the axe for me at Pennsic and I made the cover based on my existing axes.
Here's a picture of me returning the tabbard and presenting the axe.
and here are some close ups of the axe and cover:


I had been asked to be their "official" photographer for the elevation so I tried to make sure I got lots of pictures while I was hopping between activities. I was also able to do a family photo for her after the ceremony, which is always a nice keepsake.
Summer Siege, as always, was a busy event for me. It was also a Royal progress stop this year as we had a Laurel ceremony happening, so the attendance was significantly higher than usual.
Rapier:
Normally I'm running the rapier list since I'm the Canton's Rapier Marshal, but this year we tried a new format for the A&S activities and as Baronial A&S Minister I ran that instead. Gavin was kind enough to volunteer to run Rapier, and while we didn't have the record number of fencers we had last year, it looked like a pretty good turn-out and folks seemed to have fun.
Normally in the past for the event I have borrowed the Caldrithig armoured combat list poles from His Excellency Shahid, but they are rather large and heavy, and really overkill for rapier. So this year, Avelyn and I worked to make a new set of list poles, based on the ones Jocelyn loaned me last year for the Althing. We even got a bit of power tool help from Avelyn's dad, since our little hand drill was rather under-powered for the job.
The best part of them is that instead of taking up half the back of our truck, I can disassemble them and they fit into a duffel bag. They're super light weight.
Here are a couple of pictures of them in action. We'll call them the prototype, since there are some things I may want to adjust, but they seemed to work OK for their maiden event.

A&S
A lot of the work for the A&S activity was before the event, coordinating judges and entries etc. What I was hoping for was a chance for local artisans to get some feedback on projects. I had a good host of people volunteer to judge, which was really great. Unfortunately a number of people who had planned to enter items weren't in the end able to make the event. We did have one lovely embroidery entry and she seemed to get some good feedback so that's good. Hopefully it will continue to grow in the next few years.Thrown Weapons
Their Excellencies have been using Summer Siege to run both their thrown weapon's and archery champions tourneys in recent years, as its one of the few venues that lends itself to those activities in the Barony. Last year I managed to win the Thrown Weapons tourney with what was easily my best ever day on the range. The chances of me doing as well again this year were slim, but I entered again this year to defend my title, or at least make sure that I gave the winner a run for their money. :)During the tourney I knew I didn't throw as well as the previous year, but I hit a good number of throws from 10 ft, but not much from 20 ft, so I knew it would be tight.
In court I was called up to step down as champion, where I surprised Their Excellencies with a new axe and heraldic axe cover for the champion (I did the same when I stepped down as Rapier Champion, so now it's twice, so its a tradition!). Eluned picked up the axe for me at Pennsic and I made the cover based on my existing axes.
Here's a picture of me returning the tabbard and presenting the axe.
 |


So I bow my way out of court, go back to the audience and resume taking pictures. They call up the Marshal, who starts calling out the top three, and low and behold, they call me up as the winner and Their Excellencies get to give me back all the regalia once again. I think They enjoyed the joke of handing me back the axe after I just presented it. :)
Other things of note:
I would be remiss if I didn't mention the Laurel elevation in more detail. THL Alais (now Mistress Alais) focuses a lot of her research on shepherdesses and peasant practices. Her elevation was really unique as they modeled it after a Flemish village wedding ceremony, including using dances as part of the ceremony. It was really neat, and totally suited the event. I'm glad the weather was nice (if hot) and that everything seemed to go well.I had been asked to be their "official" photographer for the elevation so I tried to make sure I got lots of pictures while I was hopping between activities. I was also able to do a family photo for her after the ceremony, which is always a nice keepsake.
Monday, 18 July 2016
Trillium War notes
*****Oops, wrote this last week but forgot to post it. Bad blogger. :) *****
It's been a busy week so I'm a bit behind in my updates. Trillies was pretty busy but here are some thoughts.
Thursday:
Didn't really get all that much done on Thursday since that's the day we arrived. We setup our presence with Fettered Fleur, who let us crash our day-visit setup with them, and got our banners all setup. There was a bit of a scramble because I left our portable hole in the garage at home when I was packing the car. Fortunately there were some available at a couple of blacksmith merchants on site so we now have several. After that and a quick dinner snack, I was off to the rapier list for inspection and the torch tourney.
Friday:
Friday morning was the start of my main class I was signed up for, Mistress Lucrece's leather bottle-making class. We spent most of the morning learning about the historical context of the bottles, design types and then trying our hand at making our own. I got to do my first wet forming of leather, and picked up a few neat tricks to improve my overall leatherworking techniques. It was an ambitious schedule, so I wasn't able to get done my bottle during the class, but I have everything I need to finish it up at home when I have time.
Right afterwards, I taught my first of two classes at Trillies. We had a full class of six people (Yay). We scheduled my Intro to Leatherwork class on Friday so that people would have some time to finish their pouches in camp if they didn't finish during the class, but I think almost everyone got pretty much done during the two hours, which is really great.
I like the format of this class because its kind of free-form. Over the course of the two hours I do a bit of an intro and then everyone spends about an hour and a half sewing their leather while I basically do a show and tell about leather tools and leather. Because I pre-cut and pre-punch the holes, we can chat and discuss all kinds of things while they work, so they end up hopefully picking up a lot more basics than they would otherwise.
I got some great comments during the class, and I'm told some of the students were really excited about it when they got back to their camps, which is cool to hear.
Saturday:
I had a couple of classes I was going to take on Saturday morning but I ended up not going for a couple of reasons. Aethelbert was doing a neat class on how he makes shoes, covering last making, stitching with boar bristles etc. It would have been neat but it was first thing in the morning and being off site, we just couldn't make it.
I was also originally signed up for a knife sheath class that Henry was teaching right afterwards, but I released my spot because there were a lot of newer people on the waiting list, and I figured they would get more out of it than I would. I was able to pop in and see his home-made bone leather stamps in action though, which was cool.
Right afterwards I taught my second class of the event, my discussion about period leather dyes. Its a bit more of a specialized class, so we only ended up with two people. Otherwise I think it went fairly well. I haven't taught it lately so I felt a bit disorganized in my thoughts, but I got all of the information out. The main goal is really to give people the basic tools to be able to select leather colours that look right, even if they don't want to experiment with making their own dyes. We also talked a fair bit about how the leather dyes compare to period fabric dyes, since at least one of the ladies had some experience with natural fabric dyes.
I spent most of the rest of the afternoon at Mistress Lucrece's camp, where she was showing us how she finishes the bottles to make them water-tight using pitch and bees wax. This was her first time trying this on a camp stove setup, so there was some experimenting involved. There was much less swearing and crying than was advertised since it actually worked pretty well.
Other general stuff:
Since I was essentially in the A&S tents for most of the event, I didn't do any thrown weapons or rapier (other than the torch tourney on Thursday). I also didn't even break my camera out until court on Saturday.
During court, we got to hear the scroll text Avelyn and I wrote for Mistress Kersteken get read out when she was presented with her Hare Valiant, seemed to go over well.
I was kindly requested by Her Excellency Catherine to stick around to take pictures of the Skrael fighters at the Rose Tourney, which followed after court. I'm pretty sure this was a RUSE though (sneaky Baroness is sneaky), because the plotting had begun to make sure certain people were there to witness my Laurel, Mistress AElfwyn, being put on vigil for the Order of the Chivalry. Woot Woot!!!!!! There was a lot of cheering. :)
So I got lots of great pictures of this fine event and some pictures of the subsequent fighting before we had to go pack up our presence (we wanted ot get it packed before dark). We hung around the rest of the night visiting, going to the awesome bardic circle and otherwise doing the SCA camping thing, and then went back to our hotel for a good night sleep before driving home on Sunday.
The classes have really become a much bigger part of Trillies in recent years, which is great to see but also puts a lot more time demands on me since I spread myself pretty thin across different SCA activities. But we are an educational organization after all, so lets edumacate people when we can. ;)
Thursday, 9 June 2016
Planning for Trillium War
We're less than a month from Trillium War and things are starting to firm up. Looks like this year at war I'm going to be spending most of my time on A&S activities, rather than rapier or thrown weapons. I'll still be doing some rapier marshaling, and I'll make sure I throw in some of the tournaments since I'm the Baronial champion, but I can see me spending most of my time at the A&S tents.
I've confirmed I'll be teaching two classes this year, both of which I've taught a few times before. On Friday I'll be teaching my Intro to Leatherworking, which is basically making a small basic belt pouch as a way to learn some basics of leatherwork. I go over types of leather, stitches etc, and then we spend some time assembling a pouch.
The second class is my leather dye class, which I taught at Practicum, and at Trillies last year as well. It was specifically requested that I teach it again this year as some people missed it previously. It's more of a roundtable where we discuss what colours were achievable in period, the period leather dye sources, my experiments to get the recipes to work, and people can see the finished projects and test swatches of dyes. Aside from learning the dye process, the real goal is to show people what colours are appropriate in leather items so they can choose their leathers and modern dyes accordingly.
I'm mostly prepped for both classes, so that's good. I had some kits left over from last time I taught the intro to leatherwork class, and went to pick up some more leather at Zeli's on the weekend so I can make a few more. All the leather got cut out and pre-punched last night so all that's left is printing out the hand outs and throwing them in the bags. There's nothing really extra needed for the leather dye class other than making sure I have copies of the hand outs.
There are also a handful of classes I'm going to want to take as well, so lots to do and see this year.
We also have some things we would like to do before Trillies. For one, we'd like to finally get some banners done up (either silk or some painted ones, just to have something to jazz up our site). We're staying in a hotel, so we won't have a full camp, but some heraldry to mark us out would be nice. Fortunately we have all the supplies for doing both silk and fabric banners in the basement, so last night we spent a bit of time plotting out what we want to do. I'm hopeful to have at least a small banner or standard done up by the end of the month.
Sunday, 15 May 2016
Kingdom Award Badges - Round 2 (With Pictures)
This weekend I kept chugging along with my work on developing cutwork patterns for our Kingdom award badges. I'm now moving on to a few of the slightly more complicated badges which require a bit of a different technique.
First up, the Thorbjorn's Hammer badge.
The pattern for this badge is actually fairly simple, but it has a couple of aspects that add an element of complication to the mix. Both are elements I'll need to master as there's lots of evidence these techniques were used for the cutwork book covers, so I may as well get working at it.
So the main difference between this and the previous two badges is that the main charge on the badge, the hammer itself, is actually a floating element. So, unlike the other badges where it was just a matter of cutting out a pattern, for this one I actually had to cut out the hammer as a stand alone element and then paste it separately.
The other slightly different element is that the hammer needs a bit of tooling on it so that the handle has the right 3-D feel to it. So I had to do small tooling on a cut-out pattern before it got stuck to the badge.
Here's a picture of the pieces cut out:

And then of course after they are painted (with fabric underneath to get the right contrast):

Next up is the Orion badge. It has similar elements, with the ring on the outside and a floating main charge in the middle. The main issue with this one is the harp because I have to cut out the harp strings, which will give me a bit of practice on really small cutwork shapes.
Here are the pieces cut out and painted.


I actually think the Hammer badge is my favourite so far. Really happy with how it turned out. I think folks will really like wearing something like this (particularly if I can shrink it down so its a bit less cumbersome).
I think the Orion still needs some work. I'd like to get the strings straighter, and next time I think I'll use purple to do the outer ring instead of black, it makes the overall badge too dark right now. Plus, I think I'd try to find some lighter fabric for the purple.
First up, the Thorbjorn's Hammer badge.
The pattern for this badge is actually fairly simple, but it has a couple of aspects that add an element of complication to the mix. Both are elements I'll need to master as there's lots of evidence these techniques were used for the cutwork book covers, so I may as well get working at it.
So the main difference between this and the previous two badges is that the main charge on the badge, the hammer itself, is actually a floating element. So, unlike the other badges where it was just a matter of cutting out a pattern, for this one I actually had to cut out the hammer as a stand alone element and then paste it separately.
The other slightly different element is that the hammer needs a bit of tooling on it so that the handle has the right 3-D feel to it. So I had to do small tooling on a cut-out pattern before it got stuck to the badge.
Here's a picture of the pieces cut out:

And then of course after they are painted (with fabric underneath to get the right contrast):

Next up is the Orion badge. It has similar elements, with the ring on the outside and a floating main charge in the middle. The main issue with this one is the harp because I have to cut out the harp strings, which will give me a bit of practice on really small cutwork shapes.
Here are the pieces cut out and painted.

I have two different purple fabric colours so I tested it with both. I ended up going with the darker colour on the left because it's more herladic, although I think I need to find some different fabric that's something in between the two for future badges.


Aaaaaaand, here are the two finished badges trimmed and mounted on a belt loop.

I actually think the Hammer badge is my favourite so far. Really happy with how it turned out. I think folks will really like wearing something like this (particularly if I can shrink it down so its a bit less cumbersome).
I think the Orion still needs some work. I'd like to get the strings straighter, and next time I think I'll use purple to do the outer ring instead of black, it makes the overall badge too dark right now. Plus, I think I'd try to find some lighter fabric for the purple.
Tuesday, 10 May 2016
Kingdom Award Badges - New and Improved with Cutwork/Filigree (with pictures)
As you'll have seen from my most recent post, I'm starting the process of working on developing some new leatherwork skills with the end goal of recreating 15th century (ish) Islamic filigree book covers. There's lots to do, but I thought I'd get started by working on my cutwork/filigree skills.
When I'm working on this kind of skill development, I prefer to do it by doing something useful, rather than just wasting leather doing samples. So I thought about my project from several years ago, where I developed tooling patterns for the various award badges. So I'm upgrading my award badges to version 2.0 - now with cutwork.
Much like with the tooling versions, I started out with the easiest one first - the Maiden's Heart. It's a fairly straightforward pattern with large areas of colour. I then moved on to the Order of the Wain, again because it has a fairly straightforward colour pattern that lends itself well to cutwork.
I started out by marking the line pattern onto a wet round of leather, the same as I would for tooling. However, instead of using the swivle knife next, I actually cut out pieces of leather to create blank areas in the pattern. In the case of the Maiden's Heart, I cut out anywhere that should be blue on the pattern, while in the case of the Order of the Wain badge, I cut out the white areas.
Here's an example, using the Maiden's Heart:

The original book covers have a layer of paper or silk under the cutwork leather to have the colour that shows through. I didn't want to use paper since these could get wet, and I didn't have the right colour of silk so I went with cotton for the purposes of the badge.
Here it is over the blue cotton fabric (although looks a bit closer to purple in the light of my work desk in the basement):


So a pretty good start. They are much quicker to make this way than with the leather tooling so that's a big advantage. They do use a bit more leather though, so there's a bit of a cost trade-off for time.
I plan to experiment some more with the other badges since they'll require a bit more thought about how to do the patterns with the cutwork. I'm also thinking of scaling down the pattern so I can do the badges smaller. That wasn't feasible using the tooling techniques because my skills just weren't there (at least with the more complicated badges), but at least for these two I could probably drop the size by half and still be doable using the cutwork. It might make the badges more wearable for people, as right now they are a bit big (for my preference at least).
When I'm working on this kind of skill development, I prefer to do it by doing something useful, rather than just wasting leather doing samples. So I thought about my project from several years ago, where I developed tooling patterns for the various award badges. So I'm upgrading my award badges to version 2.0 - now with cutwork.
Much like with the tooling versions, I started out with the easiest one first - the Maiden's Heart. It's a fairly straightforward pattern with large areas of colour. I then moved on to the Order of the Wain, again because it has a fairly straightforward colour pattern that lends itself well to cutwork.
I started out by marking the line pattern onto a wet round of leather, the same as I would for tooling. However, instead of using the swivle knife next, I actually cut out pieces of leather to create blank areas in the pattern. In the case of the Maiden's Heart, I cut out anywhere that should be blue on the pattern, while in the case of the Order of the Wain badge, I cut out the white areas.
Here's an example, using the Maiden's Heart:

The original book covers have a layer of paper or silk under the cutwork leather to have the colour that shows through. I didn't want to use paper since these could get wet, and I didn't have the right colour of silk so I went with cotton for the purposes of the badge.
Here it is over the blue cotton fabric (although looks a bit closer to purple in the light of my work desk in the basement):

Then of course I have to paint the alternating colour on the leather. That's also a period practice, lots of examples of painted leather on tooled artefacts. Many of the books have either dyed leather or colour accents applied to the surface of the leather (often goldwork).
Here's the Wain badge at the painted stage:

I cut the fabric in a round to match the shape of the leather and paste it down onto a round blank piece of leather the same shape and size as the top. I then paste the cutwork piece on top so that the fabric is sandwiched between. I also cut out a strip of leather about an inch wide and the length of the circle to form the belt loop at the back. I then punch the holes around the edge of the circle and sew it all together using some light leather as trim (since otherwise the edges of the circle would be pretty messy.
Here's a picture of the two completed badges (with a ruler as per Her Excellency Lucia's request to see the scale of the item).

I plan to experiment some more with the other badges since they'll require a bit more thought about how to do the patterns with the cutwork. I'm also thinking of scaling down the pattern so I can do the badges smaller. That wasn't feasible using the tooling techniques because my skills just weren't there (at least with the more complicated badges), but at least for these two I could probably drop the size by half and still be doable using the cutwork. It might make the badges more wearable for people, as right now they are a bit big (for my preference at least).
Sunday, 24 April 2016
Planning the next project - Islamic filigree book covers
For those who've been following the saga of the stick purse/leather dyes over the years, you'll know I tend to pick major projects that will take me several years to complete. That's largely because they usually require me to learn new skills along the way. Since the stick-purse is nominally done (I say nominally since I plan to keep fiddling with the dyes as a background activity), I need a long-term new project.
I'm now officially at the starting line to start what I am dubbing "The crazy, what the heck are you thinking, Islamic filigree book cover project" (Trademark pending). I'll call it the CFP for short (Crazy Filigree Project).
I've contacted the Curator for the Islamic collection at the Chester Beatty Library in Dublin, where I first saw these crazy books. She's shared with me a paper she wrote on how they were done, along with some really close up pictures of some examples. While the pictures are super helpful, they've also showed me that this project is even tougher than I thought. Not only did they do cut-work/filigree patterns in the leather that are typically ornate for the illumination of that period, but there's leather tooling on the leather, in spaces that are only a few millimeters wide. I have no idea how they managed it, but its scary fine detail.
Here's an example from another source. This is a book from the 15th century. The area that's blue has actually been cut out of the leather and is showing the silk or paper that was placed underneath. The red lines that swirl through the blue is the leather lacework pattern that's left behind from the cutwork.
http://islamic-arts.org/wp-content/uploads/2011/10/dpc2125-176.jpg
So, lots to do:
I think for this year my goal will be to do the background research, and to work on my bookbinding skills. So for this fall's QPT, I'll try to make my first complete leatherbound book, which I can enter and get advice.
If I'm really productive I might be able to do some sample filigree work on a flat piece of leather, maybe as a scroll blank or something. I'm not going to try to get to that small a scale for my first attempts, but it's a cool enough technique that I bet some people would love it, especially Middle Eastern personas.
The other thing I could do is develop another round of badge patterns but using cutwork instead of standard leather tooling. I bet those would look sharp.
I'm now officially at the starting line to start what I am dubbing "The crazy, what the heck are you thinking, Islamic filigree book cover project" (Trademark pending). I'll call it the CFP for short (Crazy Filigree Project).
I've contacted the Curator for the Islamic collection at the Chester Beatty Library in Dublin, where I first saw these crazy books. She's shared with me a paper she wrote on how they were done, along with some really close up pictures of some examples. While the pictures are super helpful, they've also showed me that this project is even tougher than I thought. Not only did they do cut-work/filigree patterns in the leather that are typically ornate for the illumination of that period, but there's leather tooling on the leather, in spaces that are only a few millimeters wide. I have no idea how they managed it, but its scary fine detail.
Here's an example from another source. This is a book from the 15th century. The area that's blue has actually been cut out of the leather and is showing the silk or paper that was placed underneath. The red lines that swirl through the blue is the leather lacework pattern that's left behind from the cutwork.
http://islamic-arts.org/wp-content/uploads/2011/10/dpc2125-176.jpg
So, lots to do:
- Research more on period Islamic/Persian book styles
- Acquire both bookbinding equipment/supplies and knowledge
- Work on my filigree and bookbinding skills
- Develop filigree pattern for the cover(s)
- Fail several times, probably by cutting the filigree wrong, or slipping with the knife and cutting off chunks of filigree
- Swear a lot
- Figure out if I want to add to the complexity by using my period dyes (I'd put money on yes cause I'm that kind of crazy)
I'l probably need to work on this in stages, like I did for the stick-purse and dyes, so several rounds of entries at QPT before the final thing is entered at Kingdom A&S.
I think for this year my goal will be to do the background research, and to work on my bookbinding skills. So for this fall's QPT, I'll try to make my first complete leatherbound book, which I can enter and get advice.
If I'm really productive I might be able to do some sample filigree work on a flat piece of leather, maybe as a scroll blank or something. I'm not going to try to get to that small a scale for my first attempts, but it's a cool enough technique that I bet some people would love it, especially Middle Eastern personas.
The other thing I could do is develop another round of badge patterns but using cutwork instead of standard leather tooling. I bet those would look sharp.
Saturday, 2 April 2016
Thoughts about Future Kingdom A&S Entries (Part 2)
Here's part two of my post about Kingdom A&S. This one's just about what I've learned about why I enter Kingdom A&S and what I'm looking for in the process. I'm posting it because I figure I can't be the only one with these feelings and so hopefully it will help other people work their way through it. Happy to discuss here or on Facebook or even in person.
If you read part one of this post, you might ask if it was such a good day, the caliber of entries was high and my project went over well, why wasn't I jazzed following the event. That's an excellent questions.
Here's what I've figured out, and where I'm going from here.
As an A&S Minister I was super excited to see people geeking out about their work and being able to show people what they can do. And I can safely say that my feeling off had nothing to do with any expectations personally about prizes or awards because the feeling started pretty much as soon as I was done my judging. Hopefully it didn't overflow into the discussions I was having with other people, I tried really hard to be encouraging and to provide good comments.
I don't enter these things to win prizes (good thing too since I'm just not at that level compared to some of the really awesome artisans in the Kingdom. In the past, I've entered experimental projects like the leather dyes and the stick-purse, which have generated really good discussions and those have been the ones that I've been really excited about.
So after thinking about it for a while, here's what I came up with: I need to be more selective about what I enter into QPT and Kingdom A&S type events.
1) This year I felt like I SHOULD enter since the event was in our barony and I'm the Baronial A&S Minister, so I put together a project because of that, rather than because I was super excited by the research. I thought I came up with an interesting concept by recreating my original project from five years ago, but it still wasn't the same caliber as my previous two projects from a research perspective. The bottom line is it felt more like I was just showing what I had already learned, rather than actually learning anything new.
2) I think the other thing I've noticed is that people at A&S tend to gravitate towards stuff they know. I do it too. I may look at the fibre arts or illumination projects and say "oooo, that's impressive", but I'm unlikely to stop and have an in-depth discussion with the artisan because it's not something I know. I know enough to tell between an advanced effort and a beginner effort, but that's about it. Same thing goes for leather projects. There just aren't as many people interested in leatherwork in Ealdormere as most other arts, and so I don't find many people stop by to chat (unless its something so obviously awesome like Lucrece's book that everyone wants to see it). They see shoes or a purse and can appreciate the aesthetic from the perspective that we all need accessories to go with our garb, but the geeking out doesn't seem to happen as much and I think that's where I get my fun out of the event.
Solution
Given the above, here's what I think I've decided:
1) At least for A&S (QPT may be different), I think I'm going to try to avoid both entering and judging at the same event. I think judging entries on the day tied up so much time I wasn't able to be around to chat about my project with people, and since that's where I seem to get my energy from I think that its important to dedicate some time to that on the day. Given the following points that probably means I'll be entering fewer projects and judging more often at this point. I think that's OK.
3) If I'm entering leather items, they need to be projects that add to the collective knowledge base like the stick-purse and the dyes, rather than just showing off what I can do. I also think these types of projects cross the boundaries better so more people will find them interesting, rather than just people who do leatherworking.
4) Tied to point #2, I need to take advantage of QPT like I did with the stick-purse and leather dyes. Use the full A&S cycle by entering mock-ups at QPT and final projects at A&S, incorporating the input I received.
If you read part one of this post, you might ask if it was such a good day, the caliber of entries was high and my project went over well, why wasn't I jazzed following the event. That's an excellent questions.
Here's what I've figured out, and where I'm going from here.
As an A&S Minister I was super excited to see people geeking out about their work and being able to show people what they can do. And I can safely say that my feeling off had nothing to do with any expectations personally about prizes or awards because the feeling started pretty much as soon as I was done my judging. Hopefully it didn't overflow into the discussions I was having with other people, I tried really hard to be encouraging and to provide good comments.
I don't enter these things to win prizes (good thing too since I'm just not at that level compared to some of the really awesome artisans in the Kingdom. In the past, I've entered experimental projects like the leather dyes and the stick-purse, which have generated really good discussions and those have been the ones that I've been really excited about.
So after thinking about it for a while, here's what I came up with: I need to be more selective about what I enter into QPT and Kingdom A&S type events.
1) This year I felt like I SHOULD enter since the event was in our barony and I'm the Baronial A&S Minister, so I put together a project because of that, rather than because I was super excited by the research. I thought I came up with an interesting concept by recreating my original project from five years ago, but it still wasn't the same caliber as my previous two projects from a research perspective. The bottom line is it felt more like I was just showing what I had already learned, rather than actually learning anything new.
2) I think the other thing I've noticed is that people at A&S tend to gravitate towards stuff they know. I do it too. I may look at the fibre arts or illumination projects and say "oooo, that's impressive", but I'm unlikely to stop and have an in-depth discussion with the artisan because it's not something I know. I know enough to tell between an advanced effort and a beginner effort, but that's about it. Same thing goes for leather projects. There just aren't as many people interested in leatherwork in Ealdormere as most other arts, and so I don't find many people stop by to chat (unless its something so obviously awesome like Lucrece's book that everyone wants to see it). They see shoes or a purse and can appreciate the aesthetic from the perspective that we all need accessories to go with our garb, but the geeking out doesn't seem to happen as much and I think that's where I get my fun out of the event.
Solution
Given the above, here's what I think I've decided:
1) At least for A&S (QPT may be different), I think I'm going to try to avoid both entering and judging at the same event. I think judging entries on the day tied up so much time I wasn't able to be around to chat about my project with people, and since that's where I seem to get my energy from I think that its important to dedicate some time to that on the day. Given the following points that probably means I'll be entering fewer projects and judging more often at this point. I think that's OK.
2) When I'm deciding to enter a project, it needs to be something I'm going to learn something new out of. So that means either I start entering beginner projects in other areas, or enter different kinds of leather projects. That also means I need to work in advance much more than I did this year, since its going to involve more hard core research and skills development.
3) If I'm entering leather items, they need to be projects that add to the collective knowledge base like the stick-purse and the dyes, rather than just showing off what I can do. I also think these types of projects cross the boundaries better so more people will find them interesting, rather than just people who do leatherworking.
4) Tied to point #2, I need to take advantage of QPT like I did with the stick-purse and leather dyes. Use the full A&S cycle by entering mock-ups at QPT and final projects at A&S, incorporating the input I received.
So, thoughts? Agree? Disagree? Do you have a different perspective? Readers here have been seeing my various projects for years. You see what I get super excited about. Does this sound right, or am I thinking about it wrong?
Monday, 28 March 2016
Kingdom A&S - Thoughts on the Day (Part 1)
I started typing this as one big long post and it was just way too long. So, part one will be just about the day and then I'll move my thinky thoughts to part two.
Kingdom A&S was a really busy day, with entering my girdle purse and judging two other projects. Avelyn was in the kitchen most of the day helping Emelote and John with feast prep so I didn't really see her all day except for occasional runs to the car to bring stuff in for them.
When I wasn't being all judgmental or being judged in turn, I was running around taking pictures. I always feel a certain responsibility for it at local events, but especially when Erik or Alex aren't at the event. I'm the third stringer but I think having pictures is important.
I came away from the event decidedly not super jazzed up, which is unusual. Normally after QPT or A&S I leave feeling all eager to work on new projects and do stuff. This time that wasn't the case. That's why this post is a week after the event - I've been analysing my mind-set to try to figure out what's off. I'll talk about that in part two of this post.
Event Overall
My initial observation was that the caliber of projects overall was really high. When I compare to my first A&S experience (which was really what I was doing all day) I think people have been really stepping up their game.
HE Lucia tried a couple of new things this year, and it will be interesting to see what lessons learned come out of it. First, there were no categories or levels (beginner/intermediate/advanced) for projects like in previous years. That meant everything was judged on the same basic criteria. There were then sponsored prizes for different things, rather than winners of each category. The sponsor set the criteria for the prize and handed them out during the day so it didn't bog down court. I honestly didn't hear a lot of discussion about the change at the event, so I'm not sure how it went over or if there were glitches as a result. It's interesting though because you had prizes for very specific things (best 16th century thing or best thing made from or bearing the image of a sheep), so the mix of prizes was definitely different.
She also introduced an online system for judging forms, which I think got mixed results. In my case it worked fine once I figured out that the wifi signal was too weak in the basement and moved back upstairs. Based on discussions I heard on the day, some people loved it, but I did hear some grumbling. I think some people found it a challenge to find time to fill out the online forms when they were judging upwards of 5-6 projects over the course of the day (and its hard to type extensive comments on a little phone keyboard for many - I brought my bluetooth keyboard and tablet so had an easier time of it).
I also was able to get on the Vigil list early for Marguerite so got in right away. I had made a gift for her and didn't want to be lugging it around all day. :) I bought a bunch of glass jars, and Avelyn did up a bunch of fancy labels for me. We filled them with all of my key leather dying pigments and supplies. My favourite was the jar of rusting metal! I put it all in a basket along with a bunch of leather pieces and bound it all up with some garters/buckled leather straps. The trick is she's only allowed to use them to experiment with leather dying (I had to put the qualifier in because they are mostly the same pigments she uses for her "alchemy"). I gave it the title "Things to help the newly sprouted Laurel to continue to grow". :)
I couldn't get a clean picture of the contents of the basket since it kept closing but here's the basket itself:

Projects I Judged
I was tagged with judging two projects this year. In all there were only four projects related to leather (including mine) so I basically was judging two-thirds of the available projects (the third project was Lucrece's book and was so far beyond my skill level there would have been no point).
Both of the projects were impressive in their own way.
The first project was a pair of early-period shoes (as well as a set of wooden lasts used to make the shoes). Shoes or finicky things to make in the first place, throwing in making a set of wooden lasts on top of it was really neat.
Here's a picture:
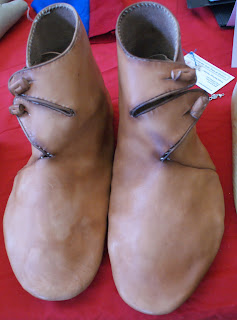
Given the hard time I had in sizing the pair of shoes I attempted, the fact that they seem to fit is really great. It'll be interesting to see if they settle in when he's wearing them or if the seams cause any issues.
The second project was an experimental project to re-purpose an old sheepskin coat into three-fingered mitts. In the end the project didn't end up working out, but we think that may be because of the materials, rather than any fault of the artisan. Certainly the research and conjectural concepts were sound. This was only the second time she'd worked with leather so I'm really pleased at the work she was able to do and she's definitely on the right track!
Here's a picture:

My Project
I've already posted pictures of my finished project on the blog, so I won't get into the details of the purse too much here. After I did my spiel on the day about what I did, why I did it etc, the conversation with the judges kind-of went into the related area of period leather dyes and whether the recipes in the Plictho are accurate representations of what was being done, or if the Master dyers would have held things back to keep their secrets. We also talked about whether the iron black recipe would have been commonly used in the period, since they had more industrial dying processes available by then.
Based on the discussion on the day and the comments in my judging sheets, there were only a few things I could improve, including:
Overall the judges seemed to be quite pleased with the end result, and with my process of getting there. I'll call it a win. :)
Coming up next: Thinky thoughts on future entries into Kingdom A&S
Kingdom A&S was a really busy day, with entering my girdle purse and judging two other projects. Avelyn was in the kitchen most of the day helping Emelote and John with feast prep so I didn't really see her all day except for occasional runs to the car to bring stuff in for them.
When I wasn't being all judgmental or being judged in turn, I was running around taking pictures. I always feel a certain responsibility for it at local events, but especially when Erik or Alex aren't at the event. I'm the third stringer but I think having pictures is important.
I came away from the event decidedly not super jazzed up, which is unusual. Normally after QPT or A&S I leave feeling all eager to work on new projects and do stuff. This time that wasn't the case. That's why this post is a week after the event - I've been analysing my mind-set to try to figure out what's off. I'll talk about that in part two of this post.
Event Overall
My initial observation was that the caliber of projects overall was really high. When I compare to my first A&S experience (which was really what I was doing all day) I think people have been really stepping up their game.
HE Lucia tried a couple of new things this year, and it will be interesting to see what lessons learned come out of it. First, there were no categories or levels (beginner/intermediate/advanced) for projects like in previous years. That meant everything was judged on the same basic criteria. There were then sponsored prizes for different things, rather than winners of each category. The sponsor set the criteria for the prize and handed them out during the day so it didn't bog down court. I honestly didn't hear a lot of discussion about the change at the event, so I'm not sure how it went over or if there were glitches as a result. It's interesting though because you had prizes for very specific things (best 16th century thing or best thing made from or bearing the image of a sheep), so the mix of prizes was definitely different.
She also introduced an online system for judging forms, which I think got mixed results. In my case it worked fine once I figured out that the wifi signal was too weak in the basement and moved back upstairs. Based on discussions I heard on the day, some people loved it, but I did hear some grumbling. I think some people found it a challenge to find time to fill out the online forms when they were judging upwards of 5-6 projects over the course of the day (and its hard to type extensive comments on a little phone keyboard for many - I brought my bluetooth keyboard and tablet so had an easier time of it).
I also was able to get on the Vigil list early for Marguerite so got in right away. I had made a gift for her and didn't want to be lugging it around all day. :) I bought a bunch of glass jars, and Avelyn did up a bunch of fancy labels for me. We filled them with all of my key leather dying pigments and supplies. My favourite was the jar of rusting metal! I put it all in a basket along with a bunch of leather pieces and bound it all up with some garters/buckled leather straps. The trick is she's only allowed to use them to experiment with leather dying (I had to put the qualifier in because they are mostly the same pigments she uses for her "alchemy"). I gave it the title "Things to help the newly sprouted Laurel to continue to grow". :)
I couldn't get a clean picture of the contents of the basket since it kept closing but here's the basket itself:

Projects I Judged
I was tagged with judging two projects this year. In all there were only four projects related to leather (including mine) so I basically was judging two-thirds of the available projects (the third project was Lucrece's book and was so far beyond my skill level there would have been no point).
Both of the projects were impressive in their own way.
The first project was a pair of early-period shoes (as well as a set of wooden lasts used to make the shoes). Shoes or finicky things to make in the first place, throwing in making a set of wooden lasts on top of it was really neat.
Here's a picture:

Given the hard time I had in sizing the pair of shoes I attempted, the fact that they seem to fit is really great. It'll be interesting to see if they settle in when he's wearing them or if the seams cause any issues.
The second project was an experimental project to re-purpose an old sheepskin coat into three-fingered mitts. In the end the project didn't end up working out, but we think that may be because of the materials, rather than any fault of the artisan. Certainly the research and conjectural concepts were sound. This was only the second time she'd worked with leather so I'm really pleased at the work she was able to do and she's definitely on the right track!
Here's a picture:

My Project
I've already posted pictures of my finished project on the blog, so I won't get into the details of the purse too much here. After I did my spiel on the day about what I did, why I did it etc, the conversation with the judges kind-of went into the related area of period leather dyes and whether the recipes in the Plictho are accurate representations of what was being done, or if the Master dyers would have held things back to keep their secrets. We also talked about whether the iron black recipe would have been commonly used in the period, since they had more industrial dying processes available by then.
Based on the discussion on the day and the comments in my judging sheets, there were only a few things I could improve, including:
- Some tweaks to my documentation (in particular the pictures I chose to use from the artwork)
- A period buckle rather than something I bought at the leather store
Overall the judges seemed to be quite pleased with the end result, and with my process of getting there. I'll call it a win. :)
Coming up next: Thinky thoughts on future entries into Kingdom A&S
Sunday, 20 March 2016
The Big Reveal - Kingdom A&S Girdle Purse (with pictures)
This past weekend was Kingdom A&S so I can now post the pictures of my project - which I've been talking about for some time.
Quick summary for those who may have missed it. I decided that since this year is five years since I first entered Kingdom A&S, and that the event was back in our Barony the same as it was that year, that I would recreate my original project. I thought it would show the progress I've made in the past five years and might help people who may not be so confident with their first attempts (because looking back on my first entry all I can think is "What was I thinking?". :)
That year I made a new type of purse I'd never tried before, a basic kidney purse. The first 5-6 posts in the Kingdom A&S tag will give you the story on that original purse.
But of course, I couldn't just do the same pouch. I upgraded the complexity of the pouch, add better finishing and decorative techniques and used historically accurate materials (with a couple of exceptions I'll talk about later).
So, without any further ado, here's a picture side by side of the two finished pouches:


Materials-wise, there's a big difference as well. The original pouch was commercially bought chrome-tan leather in a black-ish colour (turns out I was pretty close to what was produce-able in period, so that's kind of nice). The new pouch is dyed black using my vinegar black recipe from the Plictho, same as I used for previous projects.All of the stitching was done using waxed linen thread on the new pouch, as compared to artificial sinew on the original.
For the white leather, I had to make a substitution for cost/availability reasons. Goubitz indicates that pouchlets on these purses would usually have been made using either chamois leather or fabric.Given that I can't find chamois that isn't the super-stretchy auto detailing stuff, I made a substitution to use alum tawed leather, which is period appropriate. But (and there's always a but), it would have cost me $400 to ship a skin of alum tawed leather from the one place I've found it in the US - thanks to the crappy Canadian dollar right now. So I used some chrome-tanned white pigskin that I had on hand, which is almost identical to the colour, texture and thickness of the alum tawed leather.
Here are some in-progress pics (pics with red leather are the prototype that I made of the design, which Avelyn will be using).


Next post will be more about the day at the event.
Quick summary for those who may have missed it. I decided that since this year is five years since I first entered Kingdom A&S, and that the event was back in our Barony the same as it was that year, that I would recreate my original project. I thought it would show the progress I've made in the past five years and might help people who may not be so confident with their first attempts (because looking back on my first entry all I can think is "What was I thinking?". :)
That year I made a new type of purse I'd never tried before, a basic kidney purse. The first 5-6 posts in the Kingdom A&S tag will give you the story on that original purse.
But of course, I couldn't just do the same pouch. I upgraded the complexity of the pouch, add better finishing and decorative techniques and used historically accurate materials (with a couple of exceptions I'll talk about later).
So, without any further ado, here's a picture side by side of the two finished pouches:

As you can see from this top view, there's a few major differences that you can see. For one, the stitches along the top forming the flab and connecting the various layers of leather is significantly cleaner. The white trim I think really makes a huge difference and makes it pop nicely (the trim was a suggestion from one of my judges for the original pouch). In Purses in Pieces, Goubitz also shows that many of the purses had buckles and straps, which I like since it will help keep things from falling out.
What you can't necessarily see as well from this angle is that there's actually a double pouch on the new purses.Underneath the black pouch you can see, there's a second pouch with two small pouchlets on it. This is a totally documentable design and added a lot of complexity (and storage space) to the purse. Here's a picture of the second level of pouch .You can also see the draw-strings on the pouchlet on the right, I hadn't yet done the one on the left.

For the white leather, I had to make a substitution for cost/availability reasons. Goubitz indicates that pouchlets on these purses would usually have been made using either chamois leather or fabric.Given that I can't find chamois that isn't the super-stretchy auto detailing stuff, I made a substitution to use alum tawed leather, which is period appropriate. But (and there's always a but), it would have cost me $400 to ship a skin of alum tawed leather from the one place I've found it in the US - thanks to the crappy Canadian dollar right now. So I used some chrome-tanned white pigskin that I had on hand, which is almost identical to the colour, texture and thickness of the alum tawed leather.
Here are some in-progress pics (pics with red leather are the prototype that I made of the design, which Avelyn will be using).


Subscribe to:
Posts (Atom)