It's that time of year again. Kingdom A&S in Ealdormere is approaching in March, and as the host Baron and a member of the Order of the Crucible, I'm feeling like I need to pull out something from my bag of tricks.
As you may know from reading this blog in the past, I don't like doing the same old same old when it comes to A&S projects. I like things that are out of the ordinary, or that I haven't seen done before in the SCA context. That's how I got to the stick purse and the leather dyes, and I think I've come up with a good one this time.
I'm not going to get into too much detail here because I want the project to be a bit of a surprise, but I'll give some hints:
1) The item that inspired it was something I saw from one of our museum stops in Europe.
2) The type of item was not done in Europe in period, but would have been encountered by European travelers. The culture that produced it had extensive interactions with Europe, and the items go back to at least the 12th C in that culture. It didn't arrive in Europe until the early 17th C.
3) It is a leather item.....sort of. :)
4) As usual, I'm having to lean some new skills to make it.
5) As usual, I could be biting off more than I can chew, so we'll see if I can pull it off. Possible I'll enter something that's not completed or I might have to scale it down from the full period examples (which are large, incredibly ornate and complicated). To give you a sense, modern makers with extensive expertise at using traditional techniques usually take up to 5 months to make the thing I'm looking at.
On the bright side, my research is more or less complete, other than re-reading a few peer reviewed papers to make sure I've got everything for my documentation.
Showing posts with label Ealdormere. Show all posts
Showing posts with label Ealdormere. Show all posts
Tuesday, 21 January 2020
Monday, 18 July 2016
Trillium War notes
*****Oops, wrote this last week but forgot to post it. Bad blogger. :) *****
It's been a busy week so I'm a bit behind in my updates. Trillies was pretty busy but here are some thoughts.
Thursday:
Didn't really get all that much done on Thursday since that's the day we arrived. We setup our presence with Fettered Fleur, who let us crash our day-visit setup with them, and got our banners all setup. There was a bit of a scramble because I left our portable hole in the garage at home when I was packing the car. Fortunately there were some available at a couple of blacksmith merchants on site so we now have several. After that and a quick dinner snack, I was off to the rapier list for inspection and the torch tourney.
Friday:
Friday morning was the start of my main class I was signed up for, Mistress Lucrece's leather bottle-making class. We spent most of the morning learning about the historical context of the bottles, design types and then trying our hand at making our own. I got to do my first wet forming of leather, and picked up a few neat tricks to improve my overall leatherworking techniques. It was an ambitious schedule, so I wasn't able to get done my bottle during the class, but I have everything I need to finish it up at home when I have time.
Right afterwards, I taught my first of two classes at Trillies. We had a full class of six people (Yay). We scheduled my Intro to Leatherwork class on Friday so that people would have some time to finish their pouches in camp if they didn't finish during the class, but I think almost everyone got pretty much done during the two hours, which is really great.
I like the format of this class because its kind of free-form. Over the course of the two hours I do a bit of an intro and then everyone spends about an hour and a half sewing their leather while I basically do a show and tell about leather tools and leather. Because I pre-cut and pre-punch the holes, we can chat and discuss all kinds of things while they work, so they end up hopefully picking up a lot more basics than they would otherwise.
I got some great comments during the class, and I'm told some of the students were really excited about it when they got back to their camps, which is cool to hear.
Saturday:
I had a couple of classes I was going to take on Saturday morning but I ended up not going for a couple of reasons. Aethelbert was doing a neat class on how he makes shoes, covering last making, stitching with boar bristles etc. It would have been neat but it was first thing in the morning and being off site, we just couldn't make it.
I was also originally signed up for a knife sheath class that Henry was teaching right afterwards, but I released my spot because there were a lot of newer people on the waiting list, and I figured they would get more out of it than I would. I was able to pop in and see his home-made bone leather stamps in action though, which was cool.
Right afterwards I taught my second class of the event, my discussion about period leather dyes. Its a bit more of a specialized class, so we only ended up with two people. Otherwise I think it went fairly well. I haven't taught it lately so I felt a bit disorganized in my thoughts, but I got all of the information out. The main goal is really to give people the basic tools to be able to select leather colours that look right, even if they don't want to experiment with making their own dyes. We also talked a fair bit about how the leather dyes compare to period fabric dyes, since at least one of the ladies had some experience with natural fabric dyes.
I spent most of the rest of the afternoon at Mistress Lucrece's camp, where she was showing us how she finishes the bottles to make them water-tight using pitch and bees wax. This was her first time trying this on a camp stove setup, so there was some experimenting involved. There was much less swearing and crying than was advertised since it actually worked pretty well.
Other general stuff:
Since I was essentially in the A&S tents for most of the event, I didn't do any thrown weapons or rapier (other than the torch tourney on Thursday). I also didn't even break my camera out until court on Saturday.
During court, we got to hear the scroll text Avelyn and I wrote for Mistress Kersteken get read out when she was presented with her Hare Valiant, seemed to go over well.
I was kindly requested by Her Excellency Catherine to stick around to take pictures of the Skrael fighters at the Rose Tourney, which followed after court. I'm pretty sure this was a RUSE though (sneaky Baroness is sneaky), because the plotting had begun to make sure certain people were there to witness my Laurel, Mistress AElfwyn, being put on vigil for the Order of the Chivalry. Woot Woot!!!!!! There was a lot of cheering. :)
So I got lots of great pictures of this fine event and some pictures of the subsequent fighting before we had to go pack up our presence (we wanted ot get it packed before dark). We hung around the rest of the night visiting, going to the awesome bardic circle and otherwise doing the SCA camping thing, and then went back to our hotel for a good night sleep before driving home on Sunday.
The classes have really become a much bigger part of Trillies in recent years, which is great to see but also puts a lot more time demands on me since I spread myself pretty thin across different SCA activities. But we are an educational organization after all, so lets edumacate people when we can. ;)
Sunday, 15 May 2016
Kingdom Award Badges - Round 2 (With Pictures)
This weekend I kept chugging along with my work on developing cutwork patterns for our Kingdom award badges. I'm now moving on to a few of the slightly more complicated badges which require a bit of a different technique.
First up, the Thorbjorn's Hammer badge.
The pattern for this badge is actually fairly simple, but it has a couple of aspects that add an element of complication to the mix. Both are elements I'll need to master as there's lots of evidence these techniques were used for the cutwork book covers, so I may as well get working at it.
So the main difference between this and the previous two badges is that the main charge on the badge, the hammer itself, is actually a floating element. So, unlike the other badges where it was just a matter of cutting out a pattern, for this one I actually had to cut out the hammer as a stand alone element and then paste it separately.
The other slightly different element is that the hammer needs a bit of tooling on it so that the handle has the right 3-D feel to it. So I had to do small tooling on a cut-out pattern before it got stuck to the badge.
Here's a picture of the pieces cut out:

And then of course after they are painted (with fabric underneath to get the right contrast):

Next up is the Orion badge. It has similar elements, with the ring on the outside and a floating main charge in the middle. The main issue with this one is the harp because I have to cut out the harp strings, which will give me a bit of practice on really small cutwork shapes.
Here are the pieces cut out and painted.


I actually think the Hammer badge is my favourite so far. Really happy with how it turned out. I think folks will really like wearing something like this (particularly if I can shrink it down so its a bit less cumbersome).
I think the Orion still needs some work. I'd like to get the strings straighter, and next time I think I'll use purple to do the outer ring instead of black, it makes the overall badge too dark right now. Plus, I think I'd try to find some lighter fabric for the purple.
First up, the Thorbjorn's Hammer badge.
The pattern for this badge is actually fairly simple, but it has a couple of aspects that add an element of complication to the mix. Both are elements I'll need to master as there's lots of evidence these techniques were used for the cutwork book covers, so I may as well get working at it.
So the main difference between this and the previous two badges is that the main charge on the badge, the hammer itself, is actually a floating element. So, unlike the other badges where it was just a matter of cutting out a pattern, for this one I actually had to cut out the hammer as a stand alone element and then paste it separately.
The other slightly different element is that the hammer needs a bit of tooling on it so that the handle has the right 3-D feel to it. So I had to do small tooling on a cut-out pattern before it got stuck to the badge.
Here's a picture of the pieces cut out:

And then of course after they are painted (with fabric underneath to get the right contrast):

Next up is the Orion badge. It has similar elements, with the ring on the outside and a floating main charge in the middle. The main issue with this one is the harp because I have to cut out the harp strings, which will give me a bit of practice on really small cutwork shapes.
Here are the pieces cut out and painted.

I have two different purple fabric colours so I tested it with both. I ended up going with the darker colour on the left because it's more herladic, although I think I need to find some different fabric that's something in between the two for future badges.


Aaaaaaand, here are the two finished badges trimmed and mounted on a belt loop.

I actually think the Hammer badge is my favourite so far. Really happy with how it turned out. I think folks will really like wearing something like this (particularly if I can shrink it down so its a bit less cumbersome).
I think the Orion still needs some work. I'd like to get the strings straighter, and next time I think I'll use purple to do the outer ring instead of black, it makes the overall badge too dark right now. Plus, I think I'd try to find some lighter fabric for the purple.
Sunday, 24 April 2016
Planning the next project - Islamic filigree book covers
For those who've been following the saga of the stick purse/leather dyes over the years, you'll know I tend to pick major projects that will take me several years to complete. That's largely because they usually require me to learn new skills along the way. Since the stick-purse is nominally done (I say nominally since I plan to keep fiddling with the dyes as a background activity), I need a long-term new project.
I'm now officially at the starting line to start what I am dubbing "The crazy, what the heck are you thinking, Islamic filigree book cover project" (Trademark pending). I'll call it the CFP for short (Crazy Filigree Project).
I've contacted the Curator for the Islamic collection at the Chester Beatty Library in Dublin, where I first saw these crazy books. She's shared with me a paper she wrote on how they were done, along with some really close up pictures of some examples. While the pictures are super helpful, they've also showed me that this project is even tougher than I thought. Not only did they do cut-work/filigree patterns in the leather that are typically ornate for the illumination of that period, but there's leather tooling on the leather, in spaces that are only a few millimeters wide. I have no idea how they managed it, but its scary fine detail.
Here's an example from another source. This is a book from the 15th century. The area that's blue has actually been cut out of the leather and is showing the silk or paper that was placed underneath. The red lines that swirl through the blue is the leather lacework pattern that's left behind from the cutwork.
http://islamic-arts.org/wp-content/uploads/2011/10/dpc2125-176.jpg
So, lots to do:
I think for this year my goal will be to do the background research, and to work on my bookbinding skills. So for this fall's QPT, I'll try to make my first complete leatherbound book, which I can enter and get advice.
If I'm really productive I might be able to do some sample filigree work on a flat piece of leather, maybe as a scroll blank or something. I'm not going to try to get to that small a scale for my first attempts, but it's a cool enough technique that I bet some people would love it, especially Middle Eastern personas.
The other thing I could do is develop another round of badge patterns but using cutwork instead of standard leather tooling. I bet those would look sharp.
I'm now officially at the starting line to start what I am dubbing "The crazy, what the heck are you thinking, Islamic filigree book cover project" (Trademark pending). I'll call it the CFP for short (Crazy Filigree Project).
I've contacted the Curator for the Islamic collection at the Chester Beatty Library in Dublin, where I first saw these crazy books. She's shared with me a paper she wrote on how they were done, along with some really close up pictures of some examples. While the pictures are super helpful, they've also showed me that this project is even tougher than I thought. Not only did they do cut-work/filigree patterns in the leather that are typically ornate for the illumination of that period, but there's leather tooling on the leather, in spaces that are only a few millimeters wide. I have no idea how they managed it, but its scary fine detail.
Here's an example from another source. This is a book from the 15th century. The area that's blue has actually been cut out of the leather and is showing the silk or paper that was placed underneath. The red lines that swirl through the blue is the leather lacework pattern that's left behind from the cutwork.
http://islamic-arts.org/wp-content/uploads/2011/10/dpc2125-176.jpg
So, lots to do:
- Research more on period Islamic/Persian book styles
- Acquire both bookbinding equipment/supplies and knowledge
- Work on my filigree and bookbinding skills
- Develop filigree pattern for the cover(s)
- Fail several times, probably by cutting the filigree wrong, or slipping with the knife and cutting off chunks of filigree
- Swear a lot
- Figure out if I want to add to the complexity by using my period dyes (I'd put money on yes cause I'm that kind of crazy)
I'l probably need to work on this in stages, like I did for the stick-purse and dyes, so several rounds of entries at QPT before the final thing is entered at Kingdom A&S.
I think for this year my goal will be to do the background research, and to work on my bookbinding skills. So for this fall's QPT, I'll try to make my first complete leatherbound book, which I can enter and get advice.
If I'm really productive I might be able to do some sample filigree work on a flat piece of leather, maybe as a scroll blank or something. I'm not going to try to get to that small a scale for my first attempts, but it's a cool enough technique that I bet some people would love it, especially Middle Eastern personas.
The other thing I could do is develop another round of badge patterns but using cutwork instead of standard leather tooling. I bet those would look sharp.
Saturday, 2 April 2016
Thoughts about Future Kingdom A&S Entries (Part 2)
Here's part two of my post about Kingdom A&S. This one's just about what I've learned about why I enter Kingdom A&S and what I'm looking for in the process. I'm posting it because I figure I can't be the only one with these feelings and so hopefully it will help other people work their way through it. Happy to discuss here or on Facebook or even in person.
If you read part one of this post, you might ask if it was such a good day, the caliber of entries was high and my project went over well, why wasn't I jazzed following the event. That's an excellent questions.
Here's what I've figured out, and where I'm going from here.
As an A&S Minister I was super excited to see people geeking out about their work and being able to show people what they can do. And I can safely say that my feeling off had nothing to do with any expectations personally about prizes or awards because the feeling started pretty much as soon as I was done my judging. Hopefully it didn't overflow into the discussions I was having with other people, I tried really hard to be encouraging and to provide good comments.
I don't enter these things to win prizes (good thing too since I'm just not at that level compared to some of the really awesome artisans in the Kingdom. In the past, I've entered experimental projects like the leather dyes and the stick-purse, which have generated really good discussions and those have been the ones that I've been really excited about.
So after thinking about it for a while, here's what I came up with: I need to be more selective about what I enter into QPT and Kingdom A&S type events.
1) This year I felt like I SHOULD enter since the event was in our barony and I'm the Baronial A&S Minister, so I put together a project because of that, rather than because I was super excited by the research. I thought I came up with an interesting concept by recreating my original project from five years ago, but it still wasn't the same caliber as my previous two projects from a research perspective. The bottom line is it felt more like I was just showing what I had already learned, rather than actually learning anything new.
2) I think the other thing I've noticed is that people at A&S tend to gravitate towards stuff they know. I do it too. I may look at the fibre arts or illumination projects and say "oooo, that's impressive", but I'm unlikely to stop and have an in-depth discussion with the artisan because it's not something I know. I know enough to tell between an advanced effort and a beginner effort, but that's about it. Same thing goes for leather projects. There just aren't as many people interested in leatherwork in Ealdormere as most other arts, and so I don't find many people stop by to chat (unless its something so obviously awesome like Lucrece's book that everyone wants to see it). They see shoes or a purse and can appreciate the aesthetic from the perspective that we all need accessories to go with our garb, but the geeking out doesn't seem to happen as much and I think that's where I get my fun out of the event.
Solution
Given the above, here's what I think I've decided:
1) At least for A&S (QPT may be different), I think I'm going to try to avoid both entering and judging at the same event. I think judging entries on the day tied up so much time I wasn't able to be around to chat about my project with people, and since that's where I seem to get my energy from I think that its important to dedicate some time to that on the day. Given the following points that probably means I'll be entering fewer projects and judging more often at this point. I think that's OK.
3) If I'm entering leather items, they need to be projects that add to the collective knowledge base like the stick-purse and the dyes, rather than just showing off what I can do. I also think these types of projects cross the boundaries better so more people will find them interesting, rather than just people who do leatherworking.
4) Tied to point #2, I need to take advantage of QPT like I did with the stick-purse and leather dyes. Use the full A&S cycle by entering mock-ups at QPT and final projects at A&S, incorporating the input I received.
If you read part one of this post, you might ask if it was such a good day, the caliber of entries was high and my project went over well, why wasn't I jazzed following the event. That's an excellent questions.
Here's what I've figured out, and where I'm going from here.
As an A&S Minister I was super excited to see people geeking out about their work and being able to show people what they can do. And I can safely say that my feeling off had nothing to do with any expectations personally about prizes or awards because the feeling started pretty much as soon as I was done my judging. Hopefully it didn't overflow into the discussions I was having with other people, I tried really hard to be encouraging and to provide good comments.
I don't enter these things to win prizes (good thing too since I'm just not at that level compared to some of the really awesome artisans in the Kingdom. In the past, I've entered experimental projects like the leather dyes and the stick-purse, which have generated really good discussions and those have been the ones that I've been really excited about.
So after thinking about it for a while, here's what I came up with: I need to be more selective about what I enter into QPT and Kingdom A&S type events.
1) This year I felt like I SHOULD enter since the event was in our barony and I'm the Baronial A&S Minister, so I put together a project because of that, rather than because I was super excited by the research. I thought I came up with an interesting concept by recreating my original project from five years ago, but it still wasn't the same caliber as my previous two projects from a research perspective. The bottom line is it felt more like I was just showing what I had already learned, rather than actually learning anything new.
2) I think the other thing I've noticed is that people at A&S tend to gravitate towards stuff they know. I do it too. I may look at the fibre arts or illumination projects and say "oooo, that's impressive", but I'm unlikely to stop and have an in-depth discussion with the artisan because it's not something I know. I know enough to tell between an advanced effort and a beginner effort, but that's about it. Same thing goes for leather projects. There just aren't as many people interested in leatherwork in Ealdormere as most other arts, and so I don't find many people stop by to chat (unless its something so obviously awesome like Lucrece's book that everyone wants to see it). They see shoes or a purse and can appreciate the aesthetic from the perspective that we all need accessories to go with our garb, but the geeking out doesn't seem to happen as much and I think that's where I get my fun out of the event.
Solution
Given the above, here's what I think I've decided:
1) At least for A&S (QPT may be different), I think I'm going to try to avoid both entering and judging at the same event. I think judging entries on the day tied up so much time I wasn't able to be around to chat about my project with people, and since that's where I seem to get my energy from I think that its important to dedicate some time to that on the day. Given the following points that probably means I'll be entering fewer projects and judging more often at this point. I think that's OK.
2) When I'm deciding to enter a project, it needs to be something I'm going to learn something new out of. So that means either I start entering beginner projects in other areas, or enter different kinds of leather projects. That also means I need to work in advance much more than I did this year, since its going to involve more hard core research and skills development.
3) If I'm entering leather items, they need to be projects that add to the collective knowledge base like the stick-purse and the dyes, rather than just showing off what I can do. I also think these types of projects cross the boundaries better so more people will find them interesting, rather than just people who do leatherworking.
4) Tied to point #2, I need to take advantage of QPT like I did with the stick-purse and leather dyes. Use the full A&S cycle by entering mock-ups at QPT and final projects at A&S, incorporating the input I received.
So, thoughts? Agree? Disagree? Do you have a different perspective? Readers here have been seeing my various projects for years. You see what I get super excited about. Does this sound right, or am I thinking about it wrong?
Sunday, 20 March 2016
The Big Reveal - Kingdom A&S Girdle Purse (with pictures)
This past weekend was Kingdom A&S so I can now post the pictures of my project - which I've been talking about for some time.
Quick summary for those who may have missed it. I decided that since this year is five years since I first entered Kingdom A&S, and that the event was back in our Barony the same as it was that year, that I would recreate my original project. I thought it would show the progress I've made in the past five years and might help people who may not be so confident with their first attempts (because looking back on my first entry all I can think is "What was I thinking?". :)
That year I made a new type of purse I'd never tried before, a basic kidney purse. The first 5-6 posts in the Kingdom A&S tag will give you the story on that original purse.
But of course, I couldn't just do the same pouch. I upgraded the complexity of the pouch, add better finishing and decorative techniques and used historically accurate materials (with a couple of exceptions I'll talk about later).
So, without any further ado, here's a picture side by side of the two finished pouches:


Materials-wise, there's a big difference as well. The original pouch was commercially bought chrome-tan leather in a black-ish colour (turns out I was pretty close to what was produce-able in period, so that's kind of nice). The new pouch is dyed black using my vinegar black recipe from the Plictho, same as I used for previous projects.All of the stitching was done using waxed linen thread on the new pouch, as compared to artificial sinew on the original.
For the white leather, I had to make a substitution for cost/availability reasons. Goubitz indicates that pouchlets on these purses would usually have been made using either chamois leather or fabric.Given that I can't find chamois that isn't the super-stretchy auto detailing stuff, I made a substitution to use alum tawed leather, which is period appropriate. But (and there's always a but), it would have cost me $400 to ship a skin of alum tawed leather from the one place I've found it in the US - thanks to the crappy Canadian dollar right now. So I used some chrome-tanned white pigskin that I had on hand, which is almost identical to the colour, texture and thickness of the alum tawed leather.
Here are some in-progress pics (pics with red leather are the prototype that I made of the design, which Avelyn will be using).


Next post will be more about the day at the event.
Quick summary for those who may have missed it. I decided that since this year is five years since I first entered Kingdom A&S, and that the event was back in our Barony the same as it was that year, that I would recreate my original project. I thought it would show the progress I've made in the past five years and might help people who may not be so confident with their first attempts (because looking back on my first entry all I can think is "What was I thinking?". :)
That year I made a new type of purse I'd never tried before, a basic kidney purse. The first 5-6 posts in the Kingdom A&S tag will give you the story on that original purse.
But of course, I couldn't just do the same pouch. I upgraded the complexity of the pouch, add better finishing and decorative techniques and used historically accurate materials (with a couple of exceptions I'll talk about later).
So, without any further ado, here's a picture side by side of the two finished pouches:

As you can see from this top view, there's a few major differences that you can see. For one, the stitches along the top forming the flab and connecting the various layers of leather is significantly cleaner. The white trim I think really makes a huge difference and makes it pop nicely (the trim was a suggestion from one of my judges for the original pouch). In Purses in Pieces, Goubitz also shows that many of the purses had buckles and straps, which I like since it will help keep things from falling out.
What you can't necessarily see as well from this angle is that there's actually a double pouch on the new purses.Underneath the black pouch you can see, there's a second pouch with two small pouchlets on it. This is a totally documentable design and added a lot of complexity (and storage space) to the purse. Here's a picture of the second level of pouch .You can also see the draw-strings on the pouchlet on the right, I hadn't yet done the one on the left.

For the white leather, I had to make a substitution for cost/availability reasons. Goubitz indicates that pouchlets on these purses would usually have been made using either chamois leather or fabric.Given that I can't find chamois that isn't the super-stretchy auto detailing stuff, I made a substitution to use alum tawed leather, which is period appropriate. But (and there's always a but), it would have cost me $400 to ship a skin of alum tawed leather from the one place I've found it in the US - thanks to the crappy Canadian dollar right now. So I used some chrome-tanned white pigskin that I had on hand, which is almost identical to the colour, texture and thickness of the alum tawed leather.
Here are some in-progress pics (pics with red leather are the prototype that I made of the design, which Avelyn will be using).


Saturday, 6 February 2016
Update on Kingdom A&S
I'm making some good progress on my Kingdom A&S project and with still over a month to go I'm feeling more optimistic about getting it done. I have a back-up plan in place just in case, since I want to make sure I enter something, but fingers are crossed I can get my project done.
My goal is to decided in the next two weeks whether I'm going to get the pouch project done in time, so I can start on pulling together the documentation. In both cases I've done all the research and written in down in various places, I just need to drop it into my usual format with pictures etc.
So here's the update on progress. For those that missed it, I posted about the concept here.
For the past few weeks I've been working on the mock-up. It's now done. In general, the main pieces all worked out the way I was expecting. I need to adjust the size/shape of the pouchlet pieces to give more slack to them so they will cinch better. Otherwise the main things I've learned have to do with the order of assembling the pieces. Some of the steps became super time consuming and challenging because I'd already assembled some of the pieces.
I made the mock-up using good quality leather that's almost exactly the same weight and flexibility as the stuff I'm using for the final, so everything should translate well. I'm giving the mock-up to Avelyn, it's a nice red and white so will work well for things where we want to show Kingdom/Baronial colours.
The final piece will be made from the same veg tan I used for the stick purse, dyed using one of my period dyes The trim and pouchlets will be done using some lightweight white pigskin I have. It's modern chrome tan but the feel and colour is almost identical to alum tawed leather (and doesn't cost $400 a skin, which is a plus).
I have progress pictures oft the mockup and will take pics as I work on the final project, but you'll have to stay tuned until the big reveal after the event (I know, I'm such a tease). :)
Wednesday, 13 January 2016
New throwing axe cover for Baroness Christiana (with pictures)
So this one has been a long time posting but I couldn't share it publicly until the big reveal for Her Excellency Christiana. She was elevated to the Order of the Pelican over a year ago now at 12th Night in January of last year. At the time I promised to make her a fancy throwing axe cover. Unfortunately, last year was not a fun year for us at home so I've fallen way behind on my backlog of promised projects. I finally got this one done in the fall but because I haven't been to many events in the southern part of Ealdormere this year, we haven't really crossed paths. Fortunately, Lady Augusta came up for a visit for Feast of the Hare in November, and I was able to send it via Talfryn courier. She delivered it to Christiana at Wassail.
I had the advantage in making the pattern in that Christiana and I use the same type of throwing axes. HE Percival also sent me a tracing of one of her axes, but in the end I just used one of mine as a 3D model.
It isn't necessarily a period design, but I think the technique of wrapping leather around an item and making a case/sheath is probably period appropriate. I did try to search out some period axe covers but I didn't really find much. Maybe a future research project?
In any case, the first picture below shows the pattern shape I settled on based on the shape of the axe. I tooled in the Pelican on one side and then did a series of small winged snails along the front flap (Christiana's primary charge in her heraldry).
I had a hard time settling on a main colour because I wanted good contrast and was concerned if I used red the little blood drops from the pelican would be lost. In the end I used two different reds, a darker read as the main colour (which is a bit like a brick-red) and then a brighter red for the blood drops. It doesn't pop as much as if I used a contrasting colour but the white snails and pelican sure do, and it is Ealdormere after all so there has to be lots of red.

I then folded the cover around the axe and laced the bottom and the edge using artificial sinew (I thought about using waxed linen thread for authenticity but thought the artificial sinew would be more durable given that a sharp axe would be sliding in and out of the item). This is the pelican side of the cover on one of my axes.

Here's the back with the flap tied down using leather laces. Next time I'll have to rethink the closing laces as they get in the way a bit this way when you try to put the axe in or take it out. It's a bit of an awkward design, so there's room for improvement in the engineering. You'll also notice there are only four snails on the final piece while there were five in the picture above. I had to modify the size and shape of the flap once it was assembled, and one of the snails had to be sacrificed. That'll teach me not to do a mock-up of a new design.

Here's the final piece fully assembled, just before it went out the door. I'm hoping she likes it. :)

Monday, 14 September 2015
Surprise Rapier Sheath for Albrecht (with pictures)
Haven't posted for a while, largely because I didn't want to spill the beans on a surprise. But now that its been delivered I can unveil the rapier sheath that I did for Lady Emelote's fundraising event.
As announced previously, the winners of the draw were Their Excellencies Percival and Christiana. However, the trick was that neither of them are fencers, so a hand-tooled rapier sheath was probably not going to be particularly useful. :) As a result, they asked me to do a custom sheath for Albrecht for his elevation to the Order of the Laurel at Lady Mary this past weekend (now Master Albrecht).
In consultation with his lady the length is custom to his preferred rapier length (yes Albrecht, everyone was in on this plot). She also felt that his preference would be to go with more natural tones rather than the heraldic colours that I usually do. So I went with a bit of a different, more subtle approach. But because this is a very special occasion, I didn't want to just do a plain brown sheath, so I essentially did tooling covering the entire sheath.
Given that Albrecht was being recognized (at least in part) for the level of his research into historical fencing, I wanted to make this rapier sheath as historically accurate as possible (with a nod given to the fact that the rubber blunts on our rapiers mean we need a tube core for a sheath instead of the historically accurate flat wooden core).
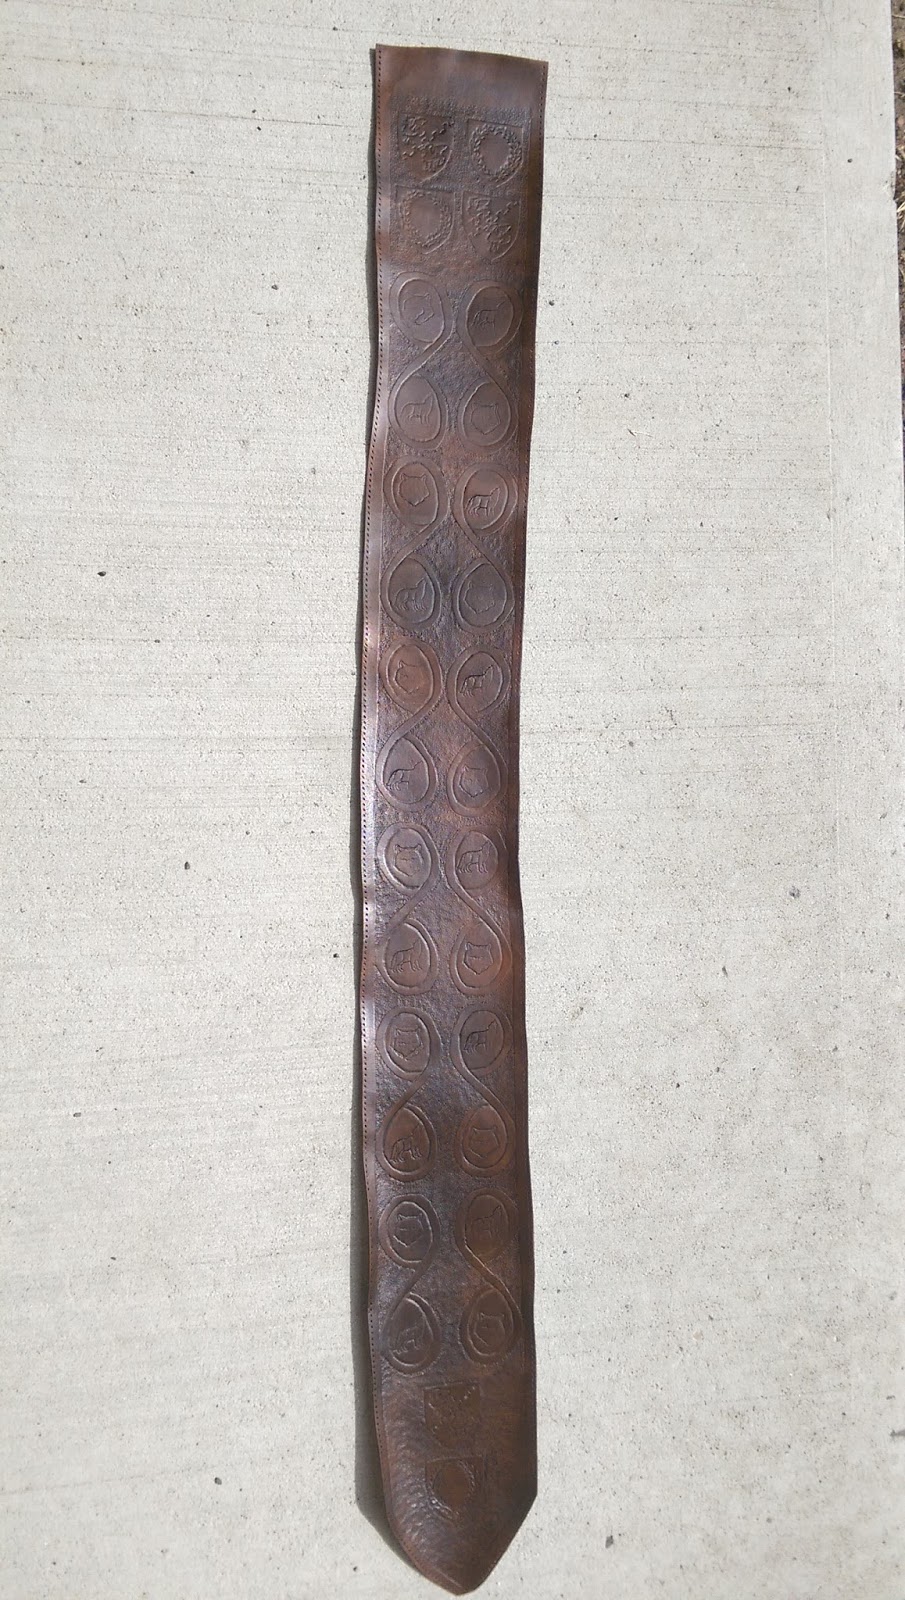
The tooling pattern is based on examples found in "Knives and Scabbards". The top portion of the sheath has side by side heraldry where I've alternated between the laurel wreath (the symbol of the Order) and Albrecht's personal heraldry. Heraldry is very common on these types of objects, this one is similar to what can be seen in item 433 (p.140) or 436 (p.142). Down the remainder of the sheath is a pattern similar to what is called a foliate in "Knives and Scabbards", again a fairly common pattern - examples can be seen in item 444 (p.145) or item 490 (p.164). I've simplified it to be a double loop repeating pattern rather than one continues pattern and turned it into more of a geometric pattern rather than leaves and branches, I've also enlarged it to better fit the larger scale of a rapier sheath since the original was just a small dagger. To fill in the extra space in the pattern since the shape is now much larger, I used two different wolf stamps, since the wolf is a key symbol for Ealdormere and stamping of leather is an entirely period process. The effect is similar to what was done in plate 25 on p.167 with a lion passant stamp.
I also used fully period tooling techniques on this one. That basically means that I didn't cut the pattern into the leather using a swivle knife (which is a modern tool). It was just etched onto the leather and then I used my shaping tools to give it depth. It's hard to see the difference unless you look really closely at two items done with the different techniques, but it does affect the depth of the tooling marks a bit.
The brown dye is a modern antiquing dye to replicate the colours that would have been produced in period (mainly because I've yet to work out a period brown dye - but I'm working on it). I used the antiquing dye because it also helps highlight the tooling marks so that they stand out better since I wouldn't be using different colour to make them stand out.
Here are the pictures from start to finish. This is easily the most complex and detailed tooling project I've done so far:


Saturday, 11 July 2015
A&S at/for Trillium War (with pictures)
So over the Canada Day quasi long weekend (the holiday was mid-week this year so we took a couple of extra days to link it to the weekend), Ealdormere's Trillium War took place. This is our big local camping event for the year, usually with a couple of hundred people there - give or take.
Approaching Trillies there was a call for teachers to do classes. I offered to teach my period dyes class from Practicum, and it generated some pretty good interest. I had four people in the class, but there were a number of people who asked for the handout beyond that since they couldn't be there Friday afternoon, so I'm glad there's some good interest in the topic.
I also had a number of projects I was trying to get done for Trillies, some of which got done and others that didn't. And of course, the problem with secret projects like these is you can't really blog about them. :)
The big one that got done was that I was asked by HE Giovanni to help him by using my period leather dyes for the vigil book for our current Baroness, HE Catherine. He was going to do the bookbinding but wanted to use the period dyes for the cover.
This was the first time I'd use my dyes for an item for anyone other than myself (the stick-purse was really the only other item I've done using the dyes so far). I thought it was a pretty big deal and was really happy to help.
There was just one thing. Catherine's favourite colour is orange, and its also a popular late period colour. That's great, except I don't actually have a period recipe for an orange dye, so I had to do some experimenting.
I had a red dye, and a yellow dye, so I figured I might be able to over-dye them to get orange, but of course things are never that simple. Fortunately the yellow dye includes alum, and with the red dye I need to pre-soak the leather with alum to get it to bind, so that looked like it could work.
Once I got the leather it had a sheen to it and wasn't absorbing the dye properly. You can see the shine in this picture:


That seemed to work, so after my tests were done on sample pieces I got down to the real work of dyeing the cover. The next two pictures are the wet leather after I'd applied the yellow, then the red. It's more of a terra cotta colour than a true orange but it's in the orange range for sure. The second pic is to give you a compare with the original tone of the leather:


Approaching Trillies there was a call for teachers to do classes. I offered to teach my period dyes class from Practicum, and it generated some pretty good interest. I had four people in the class, but there were a number of people who asked for the handout beyond that since they couldn't be there Friday afternoon, so I'm glad there's some good interest in the topic.
I also had a number of projects I was trying to get done for Trillies, some of which got done and others that didn't. And of course, the problem with secret projects like these is you can't really blog about them. :)
The big one that got done was that I was asked by HE Giovanni to help him by using my period leather dyes for the vigil book for our current Baroness, HE Catherine. He was going to do the bookbinding but wanted to use the period dyes for the cover.
This was the first time I'd use my dyes for an item for anyone other than myself (the stick-purse was really the only other item I've done using the dyes so far). I thought it was a pretty big deal and was really happy to help.
There was just one thing. Catherine's favourite colour is orange, and its also a popular late period colour. That's great, except I don't actually have a period recipe for an orange dye, so I had to do some experimenting.
I had a red dye, and a yellow dye, so I figured I might be able to over-dye them to get orange, but of course things are never that simple. Fortunately the yellow dye includes alum, and with the red dye I need to pre-soak the leather with alum to get it to bind, so that looked like it could work.
Once I got the leather it had a sheen to it and wasn't absorbing the dye properly. You can see the shine in this picture:

After consulting with Mistress AElfwyn, I tried sanding the surface of the leather. She figured the leather had been processed and that the surface had been compressed to look like it was the skin side instead of suede. Can't say I've ever sanded a piece of leather before, that was a first. The next pic shows the skin after it had been sanded:

That seemed to work, so after my tests were done on sample pieces I got down to the real work of dyeing the cover. The next two pictures are the wet leather after I'd applied the yellow, then the red. It's more of a terra cotta colour than a true orange but it's in the orange range for sure. The second pic is to give you a compare with the original tone of the leather:


And then a picture of the piece after it had dried. It faded some (as the red dye tends to do), but its still orange-ish.

And finally a picture of the end result at the Vigil at Trillium War. It actually looks way more orange in the daylight than it did in my workshop, which is great. I think Catherine was really happy with it.

Friday, 20 March 2015
Prepping for Kingdom A&S (with picture)
Kingdom A&S is coming up fast, we're now essentially three weeks out. The deadline to get all entries registered is the end of March.
I've been on the fence since I didn't think I'd have enough time to get all of the work done on the stick-purse but I've made a big-time push in the past week and a half so things are looking more positive.
Last night I finished the stitching on the final of the four pouches. That's the bulk of the hard work, so I think it may get done.
Here's a pick of the pouches in my work basket.
Next steps are to cut out all of the pieces to be dyed, so the handle leather and the drawstring straps. Then I have to do up some new batches of my various period dyes and dye the leather before assembling it all together. I also need to take a look at my documentation from QPT and make sure its updated with the details of the final project. Last time I also added a page to explain any changes that were made since QPT, which went over well with the judges. I'll probably do that again.
So, still a bit of work to do, but it may just get done in time.
I've been on the fence since I didn't think I'd have enough time to get all of the work done on the stick-purse but I've made a big-time push in the past week and a half so things are looking more positive.
Last night I finished the stitching on the final of the four pouches. That's the bulk of the hard work, so I think it may get done.
Here's a pick of the pouches in my work basket.
 |
| Final Stick-Purse in Progress - The Four Pouches |
So, still a bit of work to do, but it may just get done in time.
Saturday, 5 April 2014
General A&S To-Do List
So many ideas and projects floating around, I'm updating my list of things to work on so I can keep track. Some of these have been on the list for a loooooong time. :) These are not listed in any particular order.
- Replace Avelyn's favour (likely make a second more sturdy one for wearing in armour as well)
- Develop carving pattern for my heraldry and badge
- Figure out how to fix Avelyn's armour/finish new lamellar or alternative
- Start work on designing new leather leg pieces for Avelyn's new knee armour
- Do "commissioned" children's archery glove for Eluned
- Do "commissioned" belt favour (with award badges) for Robert the Blue
- Figure out shoe pattern
- Start research for leather tooling project
- Start research for survey of period belt hardware (buckles etc)
- Finish stick-purse
- Try blue dye recipe from Plictho using lye
- Develop period leather dye class for next Practicum
- Follow-up with Dragon Dormant about possible leatherworking class interest
- Fix Avelyn's boots
- Make silk personal and household banners for camping season
Sunday, 16 March 2014
Gulf Wars Gift Basket Contribution (With Pictures)
This post was written in advance but now that everyone is headed back from Gulf Wars I expect it should be safe to post without revealing any surprises.
At the major SCA wars, it's tradition that the various royals exchange gift baskets. Often these baskets are made up of various items made by the populace of the giving kingdom. We know in advance which kingdom's royals will be receiving the basket, so we often keep that kingdom's heraldry and colours in mind when donating the items.
This year for Gulf Wars, the recipient of Our Majesties' gift basket is Trimaris. Over the past couple of months, Her Majesty had placed a call out to the populace to for items for this gift basket.
Avelyn had the idea of donating a starter set of silk banner supplies, so we pulled together a quick collection of various colours of silk dye, along with some gutta.
I wanted to do something a bit more personal, so my contribution was of course a leather item. After some discussion, I came up with the brilliant (note: some sarcasm implied) idea of doing one of my rapier sheaths for the gift basket. Now, this isn't itself such a bad idea. The problem was that it took me so long to decide what to contribute that I'd left myself very little time to make the sheath. I basically only had a couple of weeks between when I made the decision on the sheath and Practicum (which was the last event I would see Her Majesty before she left for Gulf Wars).
For those that haven't seen one of my rapier sheaths, they are fairly time and resource heavy to make. The core of the sheath is a plastic plumbing tube that will help protect the sword from bending in transport. I then cover it with leather, which is tooled and dyed as appropriate.
There are now only five of them in existence (I have my original prototype, I gave one to the Barony when I stepped down as rapier champion, Lady Thora received a special one as a going away present and there's one in Dragon Dormant with the winner of the Border Spat tourney I ran two years ago). In all, they take probably anywhere from 10-20 hours of labour to make (actual work time, not including drying time etc.), depending on the complexity of the leather tooling and whether I have to develop a carving pattern or its something I've made before. They also require a particularly long piece of leather since you need a single piece that covers the length of the sheath - in this case about 3 1/2 feet long).
I wanted to tailor the sheath for Trimaris, so I also developed a carving pattern for their populace badge (thankfully their badge is an easy design - Thank You! to whoever designed it) and custom mixed a blue dye that would be the appropriate colour for their heraldry.
All in all I think it turned out pretty well. I hope Their Majesties of Trimaris like it, and that it will work for whoever ends up with it. I attached a little card with my contact information so who knows, they may even be reading this post some day (if so, Hi!!! Hope you like it).
And now, to the pictures:
Sunday, 2 March 2014
The Ongoing Challenge of the Period Blue Leather Dye
The last piece of my Kingdom A&S puzzle is the blue dye. For those that have been following along, this has been a bit of an ongoing saga, with multiple attempts at various recipes.
This past week I made yet another attempt at getting the dye to work. I used the first recipe I tried from the Plictho, which is basically a mixture of indigo, water and gum arabic. Based on the input a received at QPT, I adjusted the recipe process by:
This past week I made yet another attempt at getting the dye to work. I used the first recipe I tried from the Plictho, which is basically a mixture of indigo, water and gum arabic. Based on the input a received at QPT, I adjusted the recipe process by:
- Grinding the indigo finer using a mortar and pestle
- Using distilled water instead of just filtered tap water
- Soaking the leather in alum water for a full 2 minutes instead of just a quick dip
- Soaking the leather in the dye for 30 seconds rather than painting it on.
All of these changes got me absolutely no further than I was before, at least with the veg tan leather. It gives me a bit of a tint on the surface but it just rubs right off as soon as I touch it with a damp cloth.
Just for a test I did try the dye on a piece of the alum tawed leather that I ordered from the states. It seems to have worked much better, and doesn't really rub off at all. I suspect this is one of the dyes that was originally for tawed leather and that's why it isn't working on the veg tan.
As a last ditch effort, I took a piece of veg tan and let it soak in my dye jar for a full two hours, just to see if it made any difference. It didn't really do much, other than collect some of the sediment on the leather (which rubbed off pretty easily as well).
I think this recipe is a write-off at this point. I may try one more attempt at my second recipe, which uses strong vinegar, but I'm not particularly hopeful. If that doesn't work, I'll have to try some of the more challenging recipes that involve stronger chemicals like lye. But that probably won't happen for Kingdom A&S.
Still, I do have four colours working now (red, green, yellow and black), which isn't a bad project I think.
Sunday, 23 February 2014
Practicum Wrap-up
Yesterday was Practicum in Caldrithig (Ottawa). This is a bit of a unique event up in or end of the Kingdom because its entirely focused on classes and learning (mostly related to A&S). Most of the day isn't even in garb, although a lot of people wear it anyway so they don't have to change before court.
Lots happened during the day.
First, I was able to present the item I had promised Her Majesty to be included in Their gift basket for Gulf Wars next month. She was coming up for Practicum so I wanted to get it done as it would probably be the last event I'll be at before They head down south. The recipient of our gift basket this year is Trimaris. I won't be posting any details or pictures until after the event as I don't want to ruin the surprise, but I hope they'll like it. Stay tuned in a few weeks as I took lots of pictures over the past couple of weeks as I worked on it.
I also officially came full circle at Practicum this year. It was about 5ish years ago at Practicum that I took my very first leatherworking class taught by Baron Tiberius. Yesterday, I taught my first A&S class at an event, which was of course an intro to leatherworking class. I had four people, and we spent about two hours going over leather basics and working on a leather pouch. Hopefully they enjoyed the class and with any luck I'll have gotten some of them interested in leatherworking at least as well as Tiberius did with me.
I was able to take a few classes about armouring and SCA fighting being taught by Mistress AElfwyn to help me get a bit more of a background in that area now that I'm starting to go to practices and such.
The other "big" news from Practicum is that I was chosen by Baronial Council as our new Baronial A&S Minister. I have some ideas for some things I'd like to do, so I'll probably do a bit of a post about my plans in the next few days. I'll give you a hint though and say that social media will be involved. :)
All in all a pretty full day.
Friday, 7 February 2014
Project planning - What's next
Mistress AElfwyn asked me this week what my next project was going to be. I've been working on the stick-purse for so long (and then adding in the leather dyes as a side project) I haven't really thought much about what I wanted to learn/do next.
She wasn't asking about my miscellaneous functional type projects that are always on the go (carving award badges, Avelyn's armour etc.), but rather those in depth kind of projects that present a real challenge.
I figure the leather dyes are going to be an ongoing area of work, between testing other recipes, improving my methods and figuring out how to finish the leather so the dye doesn't rub off. I'm also going to do some work developing my research into a class for next year's Practicum (and maybe at other events - we'll see).
The stick-purse will continue post A&S since it won't be ready by March. I'll probably enter it if there's a QPT in the fall this year and then enter it officially in Kingdom A&S next year (depending on where it is in the Kingdom).
I was thinking of taking another attempt at making shoes. I'm kind of tired of wearing my modern black shoes at events (at least when I'm not fencing), and I know if I can figure it out there would be a few people who would be happy to have some as well (cough cough Avelyn, Emelote cough cough).
There was also those funky leather framed late-period glasses that I found a picture of. Probably not a huge challenge but it fits into my bizarre project theme. Plus, it would be neat to have actual period glasses at events. :)
Of course, the other option would be to finally use the leather that Avelyn bought me as a wedding present to make my leather jerkin based on the Museum of London artifact we saw at the museum. This might even make a good White Wolf Fian project!
Or, as has happened before, I could just stumble on a picture of something strange, like say this, and decide I just have to make it.
Friday, 31 January 2014
The Latest Stick-Purse Fail
It's certainly not a fatal kind of fail but it is a setback.
For those that have been following the project, I did a mock-up using my garment weight, chrome tan pigskins as a way to test the pouch design and it seemed to work out just fine. Here's the pic from before, (although you can see the full post with pictures from various angles here).

Since all of the mock-ups worked out and my design was set, the past few weeks I've been slowly working on the actual stick-purse. As I mentioned in my previous post, I had a feeling the leather was going to be too heavy so I started out by just doing one of the pouches as a test. That way I wouldn't waste all of my nice veg tan goat by cutting it all until I know it works.
I cut out the main pouch body, the pouchlet and the pouch base from my veg tan (using slightly heavier leather for the base). I used my vinegar black dye to dye the pouchlet piece as I have a theory about the use of colours to distinguish what coins are in which pouch. I then started to sew the parts together using my newly acquired linen thread (I'm using 18/3 thread for the body and 30/3 thread for the attachment of the pouchlet).
Once I started to assemble, I ran into some issues.
- I didn't factor the thicker leather into my assembly and pattern, so the pouchlet piece doesn't quite reach all the way around the circle like it did on the mock-up. That's an easy enough fix, I either make the circle smaller or the pouchlet piece bigger. Or use different leather.
- As I feared, the leather is just too thick and not flexible enough for the pouch design. Especially with the pouchlet, it won't pleat properly to bunch using a drawstring.
Here are pictures of where I got to this week.


So what's the plan you might ask? Well, fear not as I've already come up with something thanks to a chat I had with Master Dafydd while he was sitting his vigil for his Pelican (of course we talked about leatherworking, what else?) ;)
The original pouch at the Fries Museum is actually made from chamois leather, which is an oil an leather made from sheepskin. Most people would be familiar with this type of leather as it is also used to polish and dry your car. It's super soft and extremely absorbent. You can still find natural oil tanned chamois in various places, although I have no idea if its produced the same way as would have been done in period.
Anyway, in anticipation of my veg tan not working, I had thought to look for some natural chamois. You can get lots of synthetic stuff but the natural oil tan ones are a bit harder to find. Of course, where would you go to buy stuff like this in Canada but Canadian Tire. :)
So I now have four pieces of chamois leather, about 5 square feet each. That should be enough for what I need. The one thing with this leather is I'm not sure how well it will take dye. I have no doubt it will absorb the liquid but whether it will stay in the chamois as it dries is another question. I did apply some vinegar black to a scrap and it didn't react at all, so there are no natural tannins present. I'll have to try pre-soaking it in gallnut (as per the actual period dye recipe) to see if it will work.
If it doesn't dye properly I'll have to modify my plan. I can skip dying the pouchlets (since the original artifact didn't have them dyed) and just stick with dying the handle leather. I plan to use the veg tan for the handle as the chamois wouldn't braid very well. Since the original artifact does have a dyed handle weave, it would actually be a closer replica of the period item.
I am starting to think that this may not be ready for A&S in March, so I may only have the leather dye project at A&S and then enter this at the next one (or maybe the QPT?).
Monday, 13 January 2014
Stick-Purse Update
I'm behind schedule on the stick-purse if I'm going to get it ready for Spring A&S. The dye project is in good shape but I haven't really done much lately on the stick-purse.
Last week I did put in an order for my linen thread (for those who wanted to piggy-back, I didn't have enough room on my credit card for anything more once we put together our own order - maybe next time). It should hopefully arrive sometime this week so I can get started on assembly.
This weekend I spent a bit of time down in the basement cutting out some of the pieces for the stick-purse though. I have to say, I'm concerned the leather isn't going to work. I bought the thinnest stuff I could find, 2 oz goat, but handling it as I was cutting it, I have a feeling it will still be too stiff for the pouch body and the pouchlet.
The original purse at the Fries Museum was actually made of chamois leather, which is an oil tanning method different from veg tan. Here's some information on the different tanning methods: http://www.personal.utulsa.edu/~marc-carlson/leather/pl.html
I think I'm going to put a hold on cutting all of the parts out and just cut out one piece of each pouch piece. Once the thread comes in, I'll assemble a single pouch to see how it looks. If it doesn't work I'll need to figure out an alternative.
So what are my alternatives:
- According to the link above, buckskin and brain/deer tanned leather are also period and are essentially an oil tannage (similar to chamois), so that could be an alternative. I know Zeli's carries it, but whether it is true brain tanned leather or just chrome tanned made to look like it is another question.
- I could use my chrome tan pig skin that I have been using for pouches. It's light and flexible and would work really well (its actually what I used for my mock-up). If I can demonstrate that the actual period materials are not reasonably available and I knowingly made the substitution for the closest modern equivalent I could find, it should be OK.
The one concern I have is that I don't think my period dyes will work on either of these leathers. It certainly won't work on the chrome tan. In theory though, the leather on the handle would have needed to be a bit stiffer to weave it properly, so I could use my veg tan for that component and dye it as I originally planned.
More to come I'm sure in the next few weeks.
Thursday, 14 November 2013
Kingdom A&S and Queen's Prize Tournament
This weekend is the Queen's Prize Tournament that I've been preparing for. I've got my documentation all done up (a bit excessive for QPT at 13 pages of content but lots of pictures take up lots of space). Since this will be entered as an intermediate/advanced project for Spring A&S, I wanted to have my documentation mostly done so they can give me input on it as well.
My project won't be as visually pleasing as some - it's just a bunch of swatches, plus my containers of pigments that I used. It's not your typical A&S entry of a single object like when I did my pouch, or even my leather carving where I was presenting a finished item. This project is more about the research and experimentation. But I think it's pretty interesting and not all that common (at least based on the lack of online information available). Either way, I don't think I'll be shaming my sponsor (THL Eluned) with the project.
My discussion time is at 3 pm so I'm going to have to kill some time. This is going to be a really big event (57 people are entered in the QPT plus the regular Kingdom A&S entries) so I think I'll want to stay out of the way.
I'd prefer not to sit off somewhere reading a book like I did last time I was at Kingdom A&S, so I'm bringing my leather tooling stuff with me and will set myself up in a corner somewhere and work on award badges. Her Excellency Catherine is sponsoring a largess competition at Break the Back of Winter in March, and I thought some carved leather badges for the Kingdom awards would do the trick.
Thursday, 15 November 2012
Some project updates
I haven't really had much time to work on leather projects lately so I don't have enough to update on any individual project to justify a post. Instead, I thought I'd just do a quick post summarizing some updates and thoughts on some of the things I have on the go:
Stick-Purse
I finally heard back from the museum in the Netherlands about their stick-purse. As I thought might have been the case, my original e-mail must have gotten lost in the shuffle as they were moving to their new location. I re-sent the note last week and heard back within a couple of days. They've passed my questions on to the curator, so at least that's progress.
I was also talking with Avelyn about the project the other night. I'm hoping to have the purse completed in enough time before Kingdom A&S next year that I can actually try to convince the gatekeeper at a small local event (event still TBD) to try it instead of a cash-box to see how it works. I think that's really how the stick-purse would have been used in period, so I'd like to actually apply the concept in real life and get feedback that I can include in my A&S documentation.
Thinking about that, I need to figure out how to tell what coins are in what pouch. I don't think there's any evidence of how this would have been done in period. Perhaps the money-changer would know based on how they positioned the purse on the table. I'm also thinking the use of different colours on the pouches or the draw strings might have been an indicator. Maybe when I hear back from the curator I'll see if we can tell how the colouring on the pouch was applied (were they all the same colour, or were some different).
For my purposes I may just use different colour lacing to do the draw strings on each pouch, unless I get more info from the museum that indicates a different method.
Kingdom A&S
My Kingdom A&S submission is done for this year and I've given it to Eluned for her to take with her to the event. I've also sent in my forms in advance (even though that isn't necessary for beginner level projects) and followed up with a confirmation e-mail to the A&S Minister since I know they were having problems with the online form at one point.
My documentation ended up being a total of 22 pages, but a lot of that was the annexes which include photocopies of my references and resources. My actual written information was about 6 pages.
Hopefully it will go over well and there will be some folks there to judge it. There aren't a lot of people that specialize in leather tooling in Ealdormere (lots of people do it to some extent for armour and such but not necessarily as an A&S activity), but there are some very accomplished leather workers. Hopefully some of them will be there.
I'm a little concerned how they will judge it. While leather tooling is entirely period, and we have evidence that heraldry was tooled onto leather items, my projects are very much modern-SCA in orientation. I'm hoping they'll be OK with using period practices to produce items for use in the modern SCA.
Other Bits and Pieces
My heraldry that I submitted at Pennsic is working its way through the system and is now showing up in the OSCAR system as being out for the commentary period. Hopefully if all goes well I will have both my Arms and Badge passed early in the new year. Then I'll have to figure out the carving pattern for both. :) The badge should be fairly easy, just a blue calamari (aka krakan or squid) fieldless. The arms are a bit more complicated because there are two caravels (basically a large sailing ship) in chief that are fairly complicated to draw.
We've been doing a bit of A&S at home the past few nights, unrelated to leather. We bought some fabric paint markers and are experimenting with them vs using standard acrylic paints with fabric medium. If we can get the markers to work well it will make banner projects sooooooo much easier. We bought a few different brands and are experimenting with them to see which work best, and which have the best colour pallets.
I quickly touched base with Nathaniel at Feast of the Hare about the leather Herald's folder for the canton that he was looking for help with, but we didn't really have time to chat. I'll have to send him a note so we can scope out the project a bit more.
Subscribe to:
Posts (Atom)