Monday, 14 September 2015

Surprise Rapier Sheath for Albrecht (with pictures)

Haven't posted for a while, largely because I didn't want to spill the beans on a surprise. But now that its been delivered I can unveil the rapier sheath that I did for Lady Emelote's fundraising event.

As announced previously, the winners of the draw were Their Excellencies Percival and Christiana. However, the trick was that neither of them are fencers, so a hand-tooled rapier sheath was probably not going to be particularly useful. :) As a result, they asked me to do a custom sheath for Albrecht for his elevation to the Order of the Laurel at Lady Mary this past weekend (now Master Albrecht).

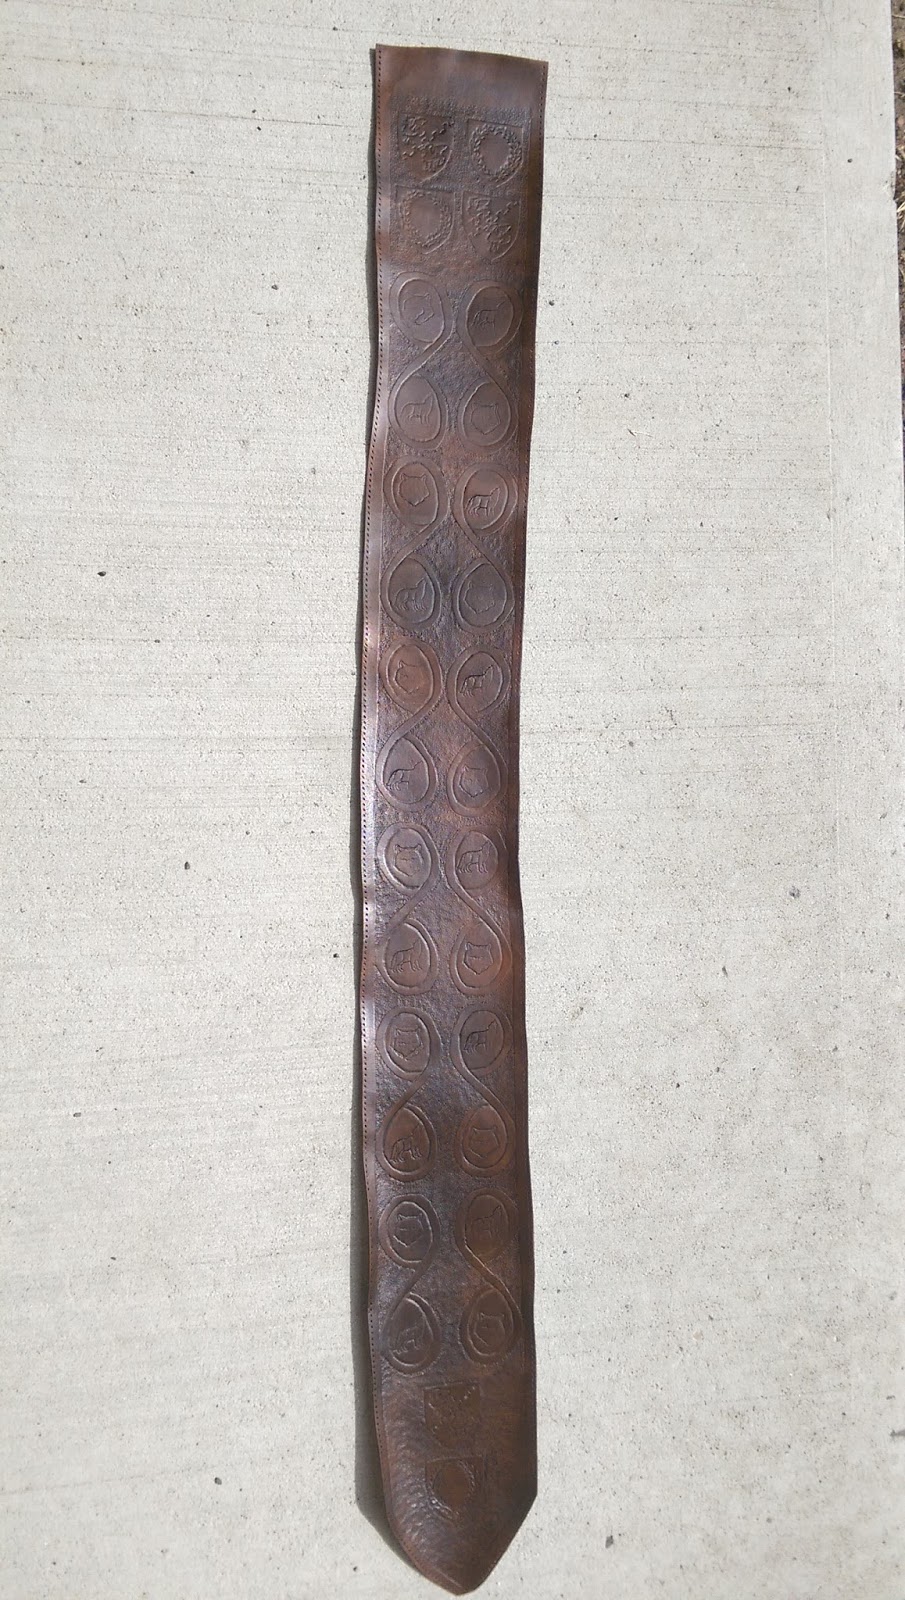
In consultation with his lady the length is custom to his preferred rapier length (yes Albrecht, everyone was in on this plot). She also felt that his preference would be to go with more natural tones rather than the heraldic colours that I usually do. So I went with a bit of a different, more subtle approach. But because this is a very special occasion, I didn't want to just do a plain brown sheath, so I essentially did tooling covering the entire sheath.

Given that Albrecht was being recognized (at least in part) for the level of his research into historical fencing, I wanted to make this rapier sheath as historically accurate as possible (with a nod given to the fact that the rubber blunts on our rapiers mean we need a tube core for a sheath instead of the historically accurate flat wooden core). 

The tooling pattern is based on examples found in "Knives and Scabbards". The top  portion of the sheath has side by side heraldry where I've alternated between the laurel wreath (the symbol of the Order) and Albrecht's personal heraldry. Heraldry is very common on these types of objects, this one is similar to what can be seen in item 433 (p.140) or 436 (p.142). Down the remainder of the sheath is a pattern similar to what is called a foliate in "Knives and Scabbards", again a fairly common pattern - examples can be seen in item 444 (p.145) or item 490 (p.164). I've simplified it to be a double loop repeating pattern rather than one continues pattern and turned it into more of a geometric pattern rather than leaves and branches, I've also enlarged it to better fit the larger scale of a rapier sheath since the original was just a small dagger. To fill in the extra space in the pattern since the shape is now much larger, I used two different wolf stamps, since the wolf is a key symbol for Ealdormere and stamping of leather is an entirely period process. The effect is similar to what was done in plate 25 on p.167 with a lion passant stamp.

I also used fully period tooling techniques on this one. That basically means that I didn't cut the pattern into the leather using a swivle knife (which is a modern tool). It was just etched onto the leather and then I used my shaping tools to give it depth. It's hard to see the difference unless you look really closely at two items done with the different techniques, but it does affect the depth of the tooling marks a bit.

The brown dye is a modern antiquing dye to replicate the colours that would have been produced in period (mainly because I've yet to work out a period brown dye - but I'm working on it). I used the antiquing dye because it also helps highlight the tooling marks so that they stand out better since I wouldn't be using different colour to make them stand out.

Here are the pictures from start to finish. This is easily the most complex and detailed tooling project I've done so far:


Monday, 24 August 2015

Summer Siege That Was

This past weekend was Summer Siege, which is my Canton's main event each year. In the past it has been in early summer but this year they tried moving it to after Pennsic to see if we could get a better turn-out, as it always seemed to conflict with local non-SCA activities early in the season. Thought I'd post a quick update on what was a really busy day.

In general it was a great event. The new site worked well, and we had great weather and a pretty good turn-out I think.

Note: While there are some A&S tidbits in this post, I spent most of the day doing martial activities so while I try to focus on A&S things on the blog this post will be a bit different. I'll hit the A&S stuff first though so if the rest doesn't interest you, you can skip it. :) It will also be a bit of a long post and not much in the way of pictures to break up the text. Sorry, I'll try to do better next time.


A&S Stuff

So Summer Siege is traditionally a small local event, and this year gate was by donation so the cash flow was a bit simpler. That made it the perfect event to test the stick-purse to see how it would work in a real-life scenario for sorting different currencies and making change. I also brought my documentation and set it up at the A&S display table, so people could take a look if they wanted to.

Thankfully our Gatekeeper was thrilled to use it (thanks Lady Jane). It certainly seemed to work better that throwing all of the bills and coins into the same container. I think the concept was that people could just drop their donations into the container, but people kept wanting change and it got complicated. The stick-purse seemed to help with that.

Jane also told me the colour coding of the bags was really helpful as they could tell what bills were in which pouch. That was my original theory and why I did the colours despite the lack of evidence of colour on the draw strings of the original artifact. It just made sense, and this seems to prove the theory.

They couldn't really use the pouchlets since they don't cinch quite closed because of the thickness of the leather on this version, but I knew about that already.

There was also some discussion about whether it would have sat better on the desk in period because it would have been filled with heavy coins rather than light paper money. I suspect that would have made some difference.

In any case, it was fun to see the stick-purse being used for essentially what it would have been used for in period, and to confirm that the design for the most part worked. I'd call that an experimental archaeology success.

Sorry, I'd meant to get a picture of the stick-purse in use but it was such a busy day I never had a chance. Maybe next year we'll use it again. I had also meant to take pictures of the items at the A&S display table for the Pinterest page, I'm a Bad Baronial A&S Minister. :)


Martial Stuff

Rapier
The main reason I was so distracted at the event was that I was the Rapier Marshall in Charge, as usual for this event. I think I've run the fencing for the last four years now. Normally we don't get a huge turn-out, I think our high previously was five fencers and we've had years where I only get one or two other fencers. This year we got 11 (although two weren't in armour) and we did five authorizations (two primary authorizations, two rigid parry authorizations and one two-weapon authorization). I also had three Marshals in Training on site so they had a chance to do lots of inspections and observe the authorization process.

The authorizations took a lot longer than expected (I only knew about one of the parry device auths ahead of time) but I'm happy to do them since its so hard for locals who don't travel much to get to events they can authorize at. Since I haven't been to practices in more than six months and am from a different Canton I actually count as an unfamiliar marshal for folks in Caldrithig (Ottawa), which makes things easier.

Unfortunately, by the time we were done most of the auths we were right in the heat of the bright sunny day. We did one of the planned tournaments for a bit (a modified bear pit with retained wounds and random plague striking the winner after a certain random number of fights), and then people just sort of did pick-ups until they tired themselves out. I brought ice water, flavour squirts, and all kinds of snacks and had nothing left to bring home other than some pretzels, the fencers seemed to have a good time and no paperwork was required for anyone doing anything silly. I'd say that's a good day of fencing.

Archery and Thrown Weapons
Summer Siege is also host to the Baronial archery and thrown weapons champions tourneys (largely because its the only regular Baronial event that is during the warm months and has the outdoor space to do these activities). Whenever I can I always try to participate in Baronial Champions Tourneys, just as a way to support Their Excellencies and to help make sure they get a good turn out. Last time I did the thrown weapons but this year I did both, since I have my new arrows that His Excellency Master Percival made me last year.

I started with the archery tournament. Given I hadn't shot in probably five years, I wasn't expecting much. My goal was to hit the target at least once and I hit it a total of four times for 8 points. That's not going to win any tournament I've ever seen but at least I shot. :)

I had more confidence at doing at least respectably at the thrown weapons since I throw my axes a few times a year. The tournament had each person throwing six times from each station (axe, knife and spear) at two distances (10 yards and 20 yards). Bulls eye was worth five points, middle ring three and outer ring one.

Surprisingly I did really well with the spears, not usually something I do well. I must have found the right balance-point or something because they we're flying really well (including a couple of bulls-eyes). I hit a few axes too but it was the spears that really bumped my score. Maybe even more surprising, I hit a couple of times at 20 yards with both the spears and the axes, something that I've never been able to do. As usually my knife throwing stunk at both distances and I clanked all of them.

I was one of the last throwers but while I knew my score was really good for me (I probably beat my personal best by something like 20 points), I didn't really have a sense of how it compared to everyone else since I was running around so much and didn't have a chance to see the other throwers. That is, I didn't have a sense until I got called into court by Their Excellencies as the winner, then I had a pretty good idea. :)

So I'm now Their Excellencies of Skraeling Althing's Thrown Weapons Champion.

Saturday, 18 July 2015

Updating the workplan

I haven't done a work planning post since January so I thought mid-summer was a good time to re-evaluate my projects and make sure I have a list of things I want to get done. I'm not making much progress I'm afraid.

This list below is copied from my last post in January. I'll strike through on stuff I've done and add in new postings in bold. List is in no particular order:

Personal A&S Stuff
  1. Finally finish the stick-purse (potentially for A&S in April)
  2. Finish developing and teach my class on period leather dyes (submitted for Practicum in February)
  3. Publish my leather dye research and experiments more formally online so people can access it for their own research and use
  4. Decide on next major project for future QPT/A&S and start planning (possibly leather filigree work based on the period Islamic book covers we saw at the Chester Beattie Library - maybe as a scroll blank?)
  5. Do groundwork research on possible Pent theme to see if its feasible (does it hit the right categories etc.) Update: It's doable but I'd need to learn woodworking, metal casting and probably a few other things so seems unlikely anytime soon.
  6. Get the helm padded and strapped, and finish modifying my kit so I can finally start working towards getting my armoured combat authorization
  7. Get Avelyn's leg armour back in shape so she can get back on the field
  8. Finally make some banners or pennants or something for events.
  9. Make garb
  10. Continue uploading my UK artifact pics on Pinterest for people to see (still several thousand pics to go). Update: Still lots to go but have a few dozen posted.
  11. Try to find a blue leather dye recipe that works (in the summer when I can work in the garage and vent it properly) Update: Recipe selected, just have to try it out.
  12. Make a pouch with a kraken design on it
  13. Make a rainbow badge for Maggie :) Update: Badge design done, just need to do the tooling and such.
  14. Figure out orange leather dye recipe and dye leather for Giovanni so he can do the vigil book for Catherine
  15. Make rapier sheath as prize for Emelote's fundraiser
  16. Make Herald's binder for Barony as per Her Excellency's request
  17. Make sheath for Constance's snips
  18. Make axe covers for Christiana
  19. See if I can get any other interesting leather dye colours (purple maybe?) to work 

MOAS Stuff
  1. More consistently get the Twitter account going and do up a plan to promote it.
  2. Investigate idea of setting up group "research days" at local university libraries.
  3. Continue to add pictures of people's work to Pinterest

Saturday, 11 July 2015

A&S at/for Trillium War (with pictures)

So over the Canada Day quasi long weekend (the holiday was mid-week this year so we took a couple of extra days to link it to the weekend), Ealdormere's Trillium War took place. This is our big local camping event for the year, usually with a couple of hundred people there - give or take.

Approaching Trillies there was a call for teachers to do classes. I offered to teach my period dyes class from Practicum, and it generated some pretty good interest. I had four people in the class, but there were a number of people who asked for the handout beyond that since they couldn't be there Friday afternoon, so I'm glad there's some good interest in the topic.

I also had a number of projects I was trying to get done for Trillies, some of which got done and others that didn't. And of course, the problem with secret projects like these is you can't really blog about them. :)

The big one that got done was that I was asked by HE Giovanni to help him by using my period leather dyes for the vigil book for our current Baroness, HE Catherine. He was going to do the bookbinding but wanted to use the period dyes for the cover.

This was the first time I'd use my dyes for an item for anyone other than myself (the stick-purse was really the only other item I've done using the dyes so far). I thought it was a pretty big deal and was really happy to help.

There was just one thing. Catherine's favourite colour is orange, and its also a popular late period colour. That's great, except I don't actually have a period recipe for an orange dye, so I had to do some experimenting.

I had a red dye, and a yellow dye, so I figured I might be able to over-dye them to get orange, but of course things are never that simple. Fortunately the yellow dye includes alum, and with the red dye I need to pre-soak the leather with alum to get it to bind, so that looked like it could work.

Once I got the leather it had a sheen to it and wasn't absorbing the dye properly. You can see the shine in this picture:


After consulting with Mistress AElfwyn, I tried sanding the surface of the leather. She figured the leather had been processed and that the surface had been compressed to look like it was the skin side instead of suede. Can't say I've ever sanded a piece of leather before, that was a first. The next pic shows the skin after it had been sanded:


That seemed to work, so after my tests were done on sample pieces I got down to the real work of dyeing the cover. The next two pictures are the wet leather after I'd applied the yellow, then the red. It's more of a terra cotta colour than a true orange but it's in the orange range for sure. The second pic is to give you a compare with the original tone of the leather:


And then a picture of the piece after it had dried. It faded some (as the red dye tends to do), but its still orange-ish.


And finally a picture of the end result at the Vigil at Trillium War. It actually looks way more orange in the daylight than it did in my workshop, which is great. I think Catherine was really happy with it. 


And the winner is.........

So you may remember that this spring I offered up a prize of a custom tooled leather rapier sheath to help raise funds for Lady Emelote's trip to cook in the Tudor kitchens at Hampton Court. Well, she's just a few weeks away from heading out on the trip, so I thought it was about time to do the draw.

All people had to do to get into the draw was make a donation (and I had to know they had made a donation obviously, but thankfully the online system kept track of that unless the donation was anonymous).

For every $25 dollars donated, I dropped a ticket into the draw, so if you donated more you got more chances to win.

Here's the link to my original post about the fundraiser.

So with no further ado, the winner of the custom rapier sheath is (drumroll please): ..................................................................................................................................................................................................................................

Their Excellencies Percival and Christiana!!!!!!!!!!!!!!!!!!

(Insert dancing winged snail and bee here)

Congratulations!

Tuesday, 21 April 2015

The Final Stick-Purse - From Kingdom A&S

It was May 2012 that I first posted on this blog about starting to do some research into the stick-purse. Almost three years later it's finally done.

The pictures below are the final project as entered at Kingdom Arts & Sciences on April 11. The dimensions are exactly the same as the original pouch at the Fries Museum (handle length, bag hight and bag diameter are all the same). The bags are made from 3-4 oz milled veg tan, which is a bit too thick for the design but I couldn't find the right kind of garment-weight chamois leather, so this was the closest I could get. The handle cover and draw strings are made from 2-3 oz veg tan goat and the base of the pouches are made from 4-5 oz veg tan cow.

The colours on the handle and the draw strings are my period leather dyes that I worked out based on period dye manuals (red, green, yellow and black).

The conversation at A&S was really good. I got a few suggestions for some tweaks to make my purse even closer to the original (changing the way I did the top of the handle, some ideas on getting the thinner chamois to work, restringing the draw strings on the pouchlets reversed to how I have them) but overall it was a really great conversation. The big thing I would change is the leather itself, as a thinner leather would allow the draw strings to close better on the pouchlets.

Next step is that I hope to test out the purse at an actual SCA event to see if it would replace the cash box at gate. I bet it would work.

There's not much more I can do on the research front unless I can get more pictures from the museum on how the bottom and backs of the pouches are constructed. I may have to see if someone can stop in at the museum and see what it looks like. Otherwise, I think the design is pretty darn close to the original.


Original artefact at the Fries Museum

My Kingdom A&S Project


Monday, 20 April 2015

Wrap-up From Practicum

Yes, I know. Practicum was in February so I'm late. What can I say, I was getting ready for Kingdom A&S.

Anyway, before I do my wrap-up for A&S I thought I should catch up on missed posts.

This year at Practicum I taught a class on period leather dyes for the first time. It was based on the dye research from the past few years and was really just intended to be an introduction for people to:
  1. Show that coloured leather was indeed available in the period the SCA covers
  2. Share recipes available for many period leather dye recipes
  3. Pass on some of the lessons I've learned from my experiments if they would like to try some of the recipes themselves.
Overall I'd say the class, which was more of a discussion session, went pretty well. I had about 6-7 people in the class and people seemed keen to learn about the subject.

The rest of the day I spent learning bookbinding with Mistress Tarian. It was hard because I kept having to bounce in and out of the class (we had a Baronial Council meeting at the end of the day as well, which took a chunk out of the time). I didn't get to covering the book with my leather but the rest pretty much got done thanks to Tarian helping to keep me caught up while I was out of the room.

Sadly, I mixed up the order of my pages so the book is all scrambled. Guess I'll have to do it again. :)

Here's a pic of the setup early on in the day: